
This post was created with help from AI tools and carefully reviewed by a human (Muntaseer Rahman) . For more on how we use AI on this site, check out our Editorial Policy.
Check Out These FREE Tools We Made JUST For You!
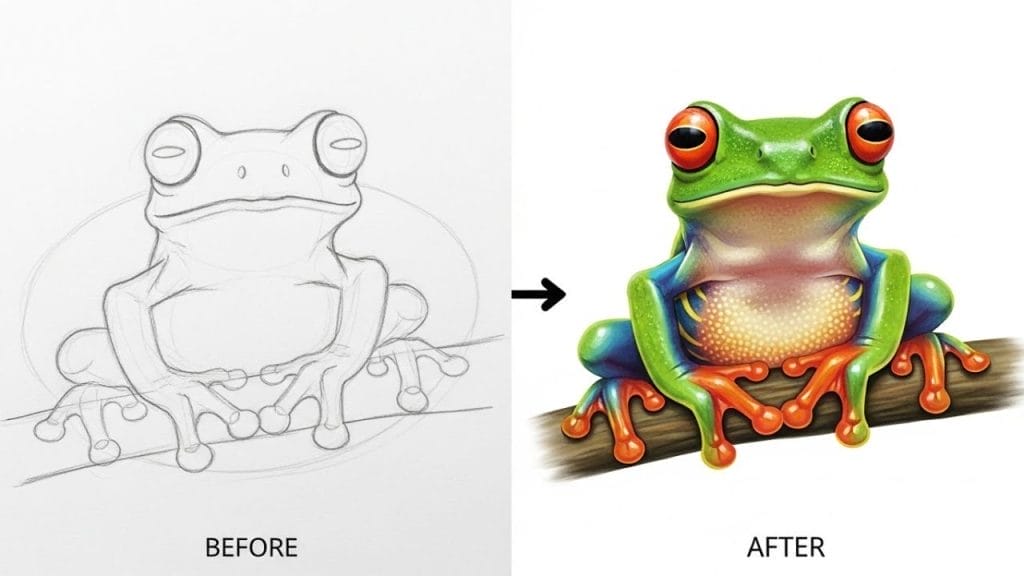
How to Draw a Tree Frog: Easy Step-by-Step Tutorial for Beginners

Tree frogs are one of the most delightful creatures to draw. With their big, expressive eyes, vibrant colors, and adorable sitting pose, they make perfect subjects for artists of all skill levels.
Whether you’re a complete beginner or looking for a fun 15-minute drawing project, this tutorial will guide you through creating an adorable tree frog using simple shapes and easy techniques.
Materials You’ll Need
Before we start, gather these basic supplies:
- Pencil (HB or 2B works great)
- Eraser
- Drawing paper or sketchbook
- Colored pencils, markers, or crayons in greens, yellows, and blues
- Black pen or fine marker for outlining (optional)
- Reference photo of a tree frog (optional but helpful)
Don’t worry if you don’t have fancy art supplies. A regular pencil and some basic coloring tools will work perfectly for this tutorial.
Step 1: Draw the Body Oval
Start by drawing a horizontal oval for the frog’s body. Make it slightly wider than it is tall, almost like a flattened egg shape. This will be the foundation of your tree frog, so draw it lightly with your pencil.
The oval doesn’t need to be perfect – tree frogs have plump, rounded bodies, so a slightly imperfect shape actually adds character.
Position this oval in the lower half of your paper, leaving plenty of room above for the head and eyes.
Step 2: Add the Head Circle
Draw a circle that overlaps the top portion of your body oval. The circle should be about two-thirds the width of the body and positioned so that about one-third of it overlaps with the body oval. This creates the frog’s rounded head and gives your drawing that characteristic frog silhouette.
The head and body should flow together naturally. If they look too separate, you can adjust by making the overlapping area slightly larger.
Step 3: Draw the Large Bulging Eyes
Tree frogs are famous for their enormous, adorable eyes. Draw two large circles on top of the head circle, positioned slightly to the sides. These eye circles should be almost as wide as the head itself – don’t be shy about making them big!
Each eye should extend above the top of the head circle, giving your frog that classic wide-eyed appearance.
Space the eyes apart so there’s a small gap between them. The eyes shouldn’t touch, but they should be close enough to give your frog a friendly, curious expression.
Step 4: Sketch the Front Legs
Tree frogs have delicate-looking front legs that they use for gripping branches. Starting from the lower sides of the body, draw two small, thin arms that angle downward and slightly forward. Each arm should be about half the length of the body.
At the end of each arm, draw a small hand with four tiny fingers spread out. Tree frog fingers are thin and delicate, almost like little twigs. Add small circular pads at the end of each finger – these are the adhesive toe pads that help tree frogs stick to surfaces.
Step 5: Add the Back Legs
The back legs are larger and more muscular than the front legs, as frogs use them for jumping. Draw the back legs in a sitting position, tucked beside the body. Start from the lower back portion of the body oval and draw a curved line that goes out to the side, then bends forward.
The back legs should have a distinct bend in the middle (the knee area) and end with a large foot. Each back foot should have five toes, also with circular toe pads. The back feet are positioned flat on the ground, as if your frog is sitting and ready to leap.
Make sure the back legs are thicker than the front legs, especially in the thigh area, to show the powerful jumping muscles.
Step 6: Draw the Facial Features
Now it’s time to bring your tree frog to life with facial features. Inside each large eye circle, draw a smaller circle for the pupil. Position the pupils slightly toward the center and upper part of the eye for a cute, alert expression.
You can also add a tiny white circle or dot inside each pupil to create a highlight that makes the eyes look shiny and alive.
Draw a simple curved line for the mouth, starting from one side of the head and curving gently to the other side. The curve should be subtle and positioned below the eyes, roughly where the head meets the body.
Tree frogs have small mouths, so keep this line delicate. You can add a slight upward curve at the ends to give your frog a friendly smile.
Add two small dots or short lines above the eyes for nostrils, positioned near the top center of the head.
Step 7: Add Details and Texture
This is where your tree frog really comes together. Erase any overlapping guidelines where the head meets the body, blending these shapes into one smooth form. Clean up any extra lines from the legs and feet as well.
Add some subtle details to make your frog more realistic. Draw a few gentle curved lines on the body to suggest the roundness and form.
You can add small curved lines or dots along the back and legs to indicate the slightly bumpy texture of tree frog skin. Don’t overdo it – just a few marks will give the right effect.
Define the toe pads more clearly by drawing small circles at the end of each finger and toe. These should look like tiny suction cups. You can also add a slight curve to the underside of the body to show where the belly meets the ground.
Step 8: Color Your Tree Frog
Now for the fun part – adding vibrant color! Tree frogs come in spectacular shades, so feel free to get creative. The most common color scheme is bright lime green, but you can also use blue-green, yellow-green, or even add touches of blue, yellow, or orange.
Start by coloring the entire body with your base green color. Use a lighter shade of green or yellow for the belly and the underside of the legs.
This creates natural-looking dimension and shows that tree frogs typically have lighter undersides.
Color the eyes with a bright golden yellow or orange, leaving the pupils black. Add the white highlight dot to make the eyes sparkle. You can add a thin ring of darker color around the iris for extra detail.
Use darker shades of green to add shadows under the legs, along the sides of the body, and around the edges. This shading creates depth and makes your frog look three-dimensional. Blend the colors smoothly for a more polished look, or leave them slightly sketchy for a fun, energetic style.
For a finishing touch, you can outline your tree frog with a black pen or fine marker. This makes the drawing pop and gives it a clean, professional appearance.
Tips for Drawing Better Tree Frogs
Keep the eye size generous. One of the most charming features of tree frogs is their disproportionately large eyes compared to their body. If you’re unsure, make them bigger rather than smaller.
Don’t forget those toe pads. The circular adhesive pads on the fingers and toes are what make a tree frog look like a tree frog rather than just any frog. These small details make a big difference in the final result.
Use vibrant, saturated colors. Tree frogs are known for their brilliant coloring, so don’t hold back. Bright greens, electric blues, and vivid yellows will make your drawing stand out.
Study the sitting pose. Tree frogs have a distinctive way of sitting with their back legs folded beside their body and their front legs straight. Getting this pose right immediately makes your drawing recognizable as a tree frog.
Add a simple background. Drawing your tree frog on a branch or leaf can really complete the scene. A simple brown branch with a few green leaves takes only a few extra minutes but makes your artwork look finished and polished.
Common Mistakes to Avoid
Making the legs too long or too short can throw off the proportions. Tree frog legs are moderately sized – not stubby like a toad’s, but not super long like a ranid frog’s legs. Aim for a balanced, compact appearance.
Forgetting the overlapping body and head creates a disconnected look. Make sure these shapes blend together naturally where they meet, rather than looking like two separate circles stuck together.
Using dull or dark colors can make your tree frog look muddy. Tree frogs are famous for their bright, eye-catching colors, so choose the most vibrant shades available in your color set.
Drawing the eyes too small is probably the most common mistake. Remember, oversized eyes are part of what makes tree frogs so adorable and recognizable.
Variations to Try
Once you’ve mastered this basic cartoon-style tree frog, you can experiment with different approaches.
Realistic style: Add more anatomical details like visible muscles in the legs, textured skin with small bumps and patterns, more complex eye structure with visible pupils and irises, and natural coloring with subtle shading and highlights.

Kawaii or chibi style: Make the eyes even bigger (taking up most of the head), simplify the body into a more rounded blob shape, make the legs tiny and stubby, and add sparkles or hearts for extra cuteness.
Different angles: Try drawing your tree frog from the side view to show the profile, from above looking down on the back, or from the front facing directly toward you for a symmetrical design.
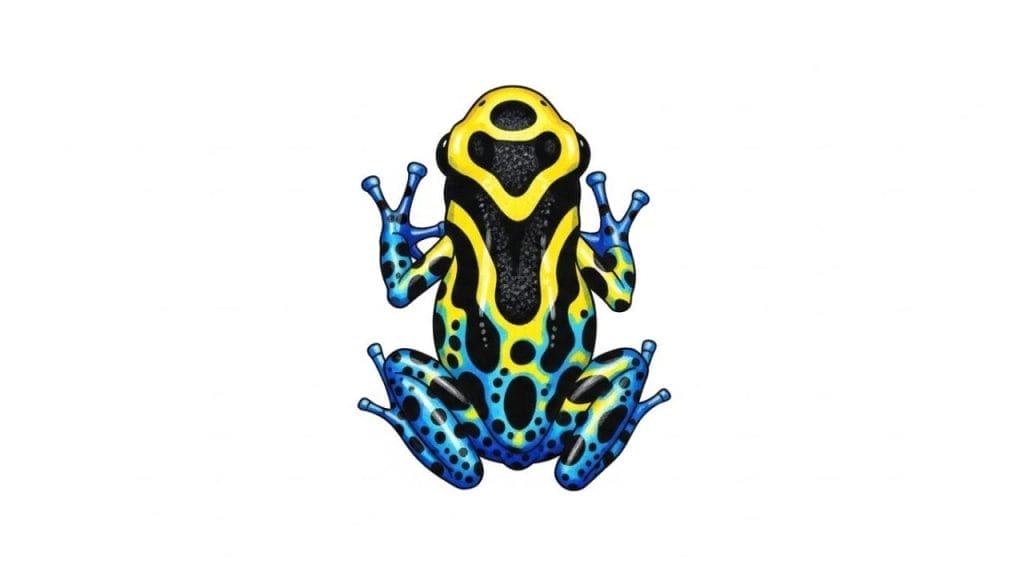
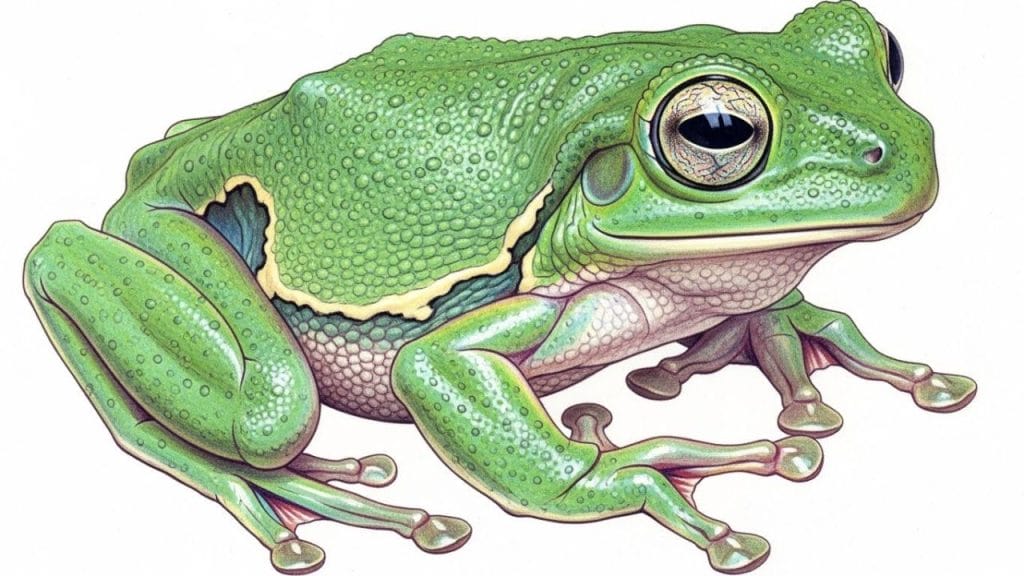
Different species: Red-eyed tree frogs have distinctive red eyes and blue-and-yellow striped sides, White’s tree frogs are chunkier with a more dumpy appearance, and poison dart frogs come in wild color combinations like blue and black or yellow and black.
Final Thoughts
Drawing a tree frog is a wonderful way to practice basic shapes, proportions, and color theory. The simple structure makes it accessible for beginners, while the details and coloring offer plenty of room for creativity and personal style.
Whether you’re drawing for fun, creating art for a school project, or just want to improve your animal drawing skills, this tree frog tutorial gives you a solid foundation.
The beauty of this tutorial is that no two tree frogs need to look exactly alike. Each one you draw will have its own personality and charm. So grab your pencils, follow these steps, and create your own adorable tree frog. Don’t worry about making it perfect – even wonky tree frogs are cute tree frogs!
Happy drawing!

About Author
Hello, I’m Muntaseer Rahman, the owner of AcuarioPets.com. I’m passionate about aquarium pets like shrimps, snails, crabs, and crayfish. I’ve created this website to share my expertise and help you provide better care for these amazing pets.
Disclaimer
This site is owned and operated by Muntaseer Rahman. AcuarioPets.com is a participant in the Amazon Services LLC Associates Program, an affiliate advertising program designed to provide a means for sites to earn advertising fees by advertising and linking to Amazon.com. This site also participates in other affiliate programs and is compensated for referring traffic and business to these companies.