
This post was created with help from AI tools and carefully reviewed by a human (Muntaseer Rahman) . For more on how we use AI on this site, check out our Editorial Policy.
Check Out These FREE Tools We Made JUST For You!
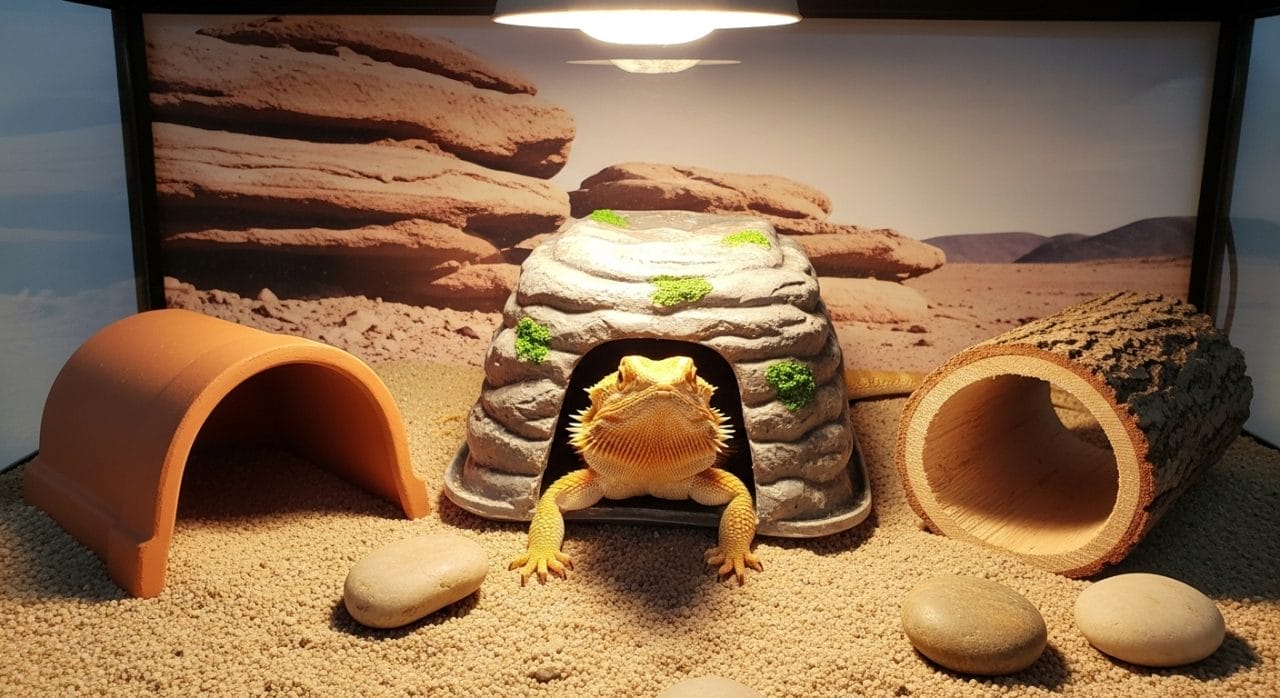
DIY Bearded Dragon Accessories Ideas – Save Money & Make Your Beardie Happy
Look, I get it – you walk into a pet store and suddenly that plastic rock costs $40, and you’re wondering if they’re selling you the actual moon or just some molded foam.
Your bearded dragon needs stuff to climb on, hide under, and lounge around like the tiny prehistoric boss they are, but you don’t need to take out a second mortgage to make it happen.
Why DIY Accessories Are Actually Smart (Not Just Cheap)
Making your own bearded dragon stuff isn’t just about saving money – though let’s be honest, that’s a huge bonus.
Store-bought accessories don’t always fit your specific tank setup, and half the time they fall apart after a few months anyway.
When you make your own, you can customize everything to fit your dragon’s personality and your tank’s exact dimensions.
Plus, you probably already have half this stuff lying around your house.
Safety First (Because Nobody Wants a Trip to the Reptile ER)
Before we get into the fun stuff, let’s talk about what NOT to use.
Materials to Avoid
Cedar and redwood are toxic – the oils in these woods can seriously harm your beardie.
Unsealed pine is also a no-go unless you seal it completely with aquarium-safe sealant.
Skip anything with sharp edges, small parts that could be swallowed, or materials that could trap your dragon’s claws.
Safe Materials You CAN Use
Oak, birch, and sealed wood are all perfectly fine once properly treated.
Melamine board, foam board, and non-toxic PVA glue are your best friends for building projects.
For fabric items, stick with fleece, denim, or old t-shirts – nothing with loops that could catch tiny dragon toes.
Always use aquarium-safe sealant on anything that might absorb moisture, and let everything air out for at least 48 hours before putting it in the tank.

Your Beardie Has More to Say…
This article tells you WHAT to do, but do you know WHY your dragon needs it? Or what they’re thinking when you do it wrong?
Read the full rant (all 20 chapters of it) in: “What Your Bearded Dragon Wishes You Knew”
*Told by a very frustrated beardie who’s had ENOUGH of watching you guess.*
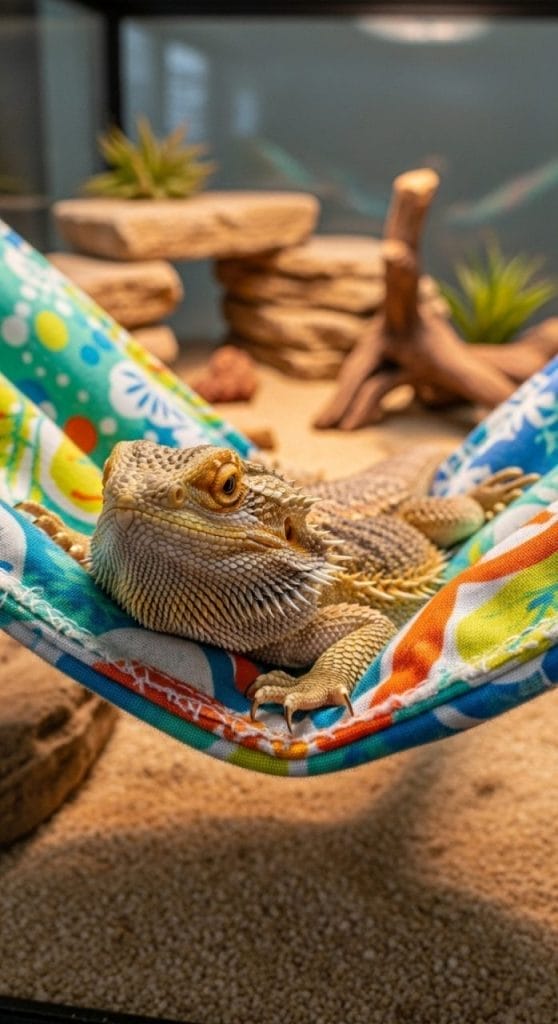
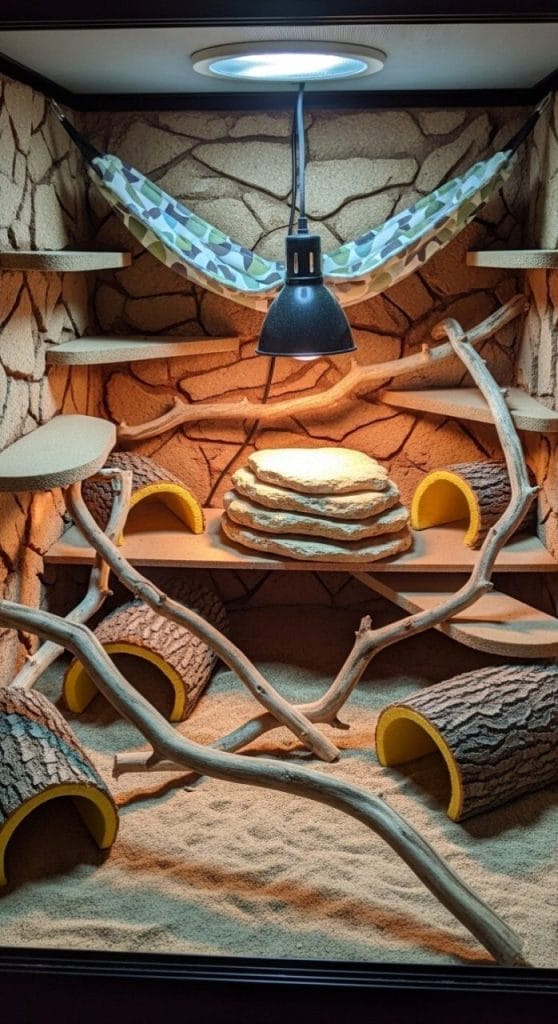
The Famous DIY Hammock (Your Beardie’s Future Favorite Spot)
Bearded dragons are semi-arboreal, which is just a fancy way of saying they love hanging out off the ground.
In the wild, they climb trees to bask, hunt bugs, and get away from things that want to eat them.
Super Easy Sock/Fabric Hammock
What you need: Old sock or piece of fabric (fleece works great), scissors, 3 suction cup hooks or 3M Command hooks
How to make it: Cut your fabric into a triangle big enough for your dragon to fit on comfortably – think about the size with their tail fully stretched out.
Cut small holes in each of the three corners, about half an inch from the edge so they don’t rip.
Stick your hooks in a corner of the tank (3M Command hooks are way better than suction cups because they actually stay put), and hang your triangle through the holes.
Pro tip: If you’re using solid fabric instead of mesh, mount it on the cool side of the tank so it doesn’t block UVB light.
The Fancy Denim Hammock
What you need: Old pair of jeans (Goodwill has them for like $3), scissors, grommet kit from any hardware store, Command hooks
How to make it: Cut two triangle pieces from the jeans and sew them together inside-out, then flip it right-side-out for finished edges.
Install grommets in the corners using your kit – this prevents the holes from ripping and looks way more professional.
This version is machine washable and will last forever because denim is basically indestructible.
Why Your Hammock Keeps Falling Down
If you’re using suction cups, stop right now and switch to 3M Command hooks.
Suction cups fail constantly, especially when they’re holding up a chunky adult beardie who just ate five dubias.
Command hooks stick with actual adhesive and can handle way more weight without randomly giving up at 3 AM and scaring the life out of you.
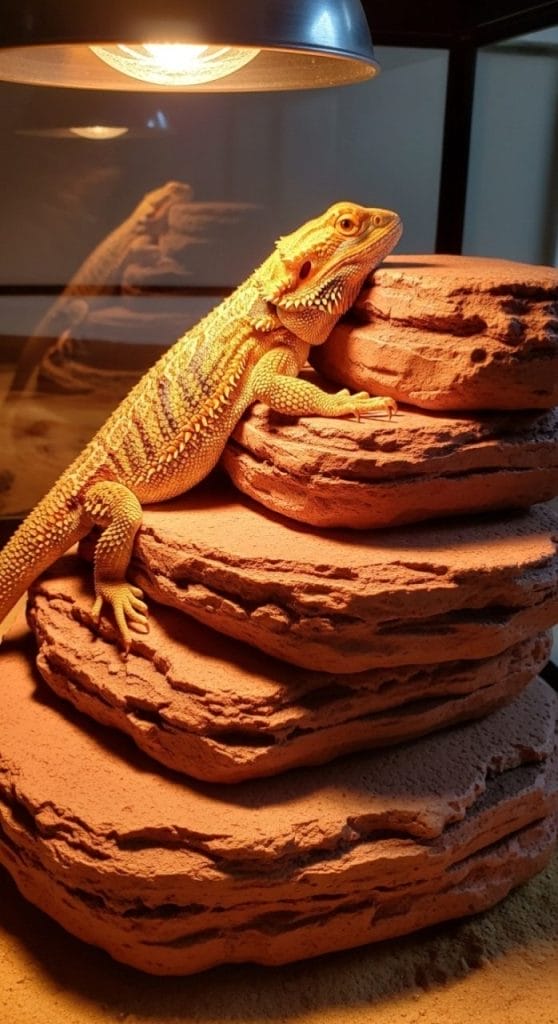
DIY Basking Rocks (That Don’t Cost $50)
Your beardie needs a basking spot where they can get up close and personal with their heat lamp.
The basking surface should hit between 95-105°F for proper thermoregulation.
Foam Board Basking Platform
What you need: Foam insulation board (from Lowe’s or Home Depot), box cutter, non-toxic waterproof PVA glue, aquarium-safe sealant, non-toxic paint (optional)
How to make it: Carve your foam board into rock shapes using a box cutter – you can get as creative as you want here.
The best part about foam is it’s incredibly light but looks realistic when you’re done.
Coat everything thoroughly with PVA glue, let it dry, then seal it completely with aquarium-safe sealant.
You can add sand to the wet glue for texture before sealing, which makes it look even more like real stone.
Let everything cure and air out for at least 48 hours before adding it to the tank.
Stacked Slate or Flagstone
What you need: Flat stones like slate or flagstone (cheap at hardware stores), aquarium-safe silicone
How to make it: Stack your stones to create levels and platforms, using silicone to secure them together.
The rough texture is perfect for keeping your beardie’s nails naturally filed down.
Stone absorbs and holds heat really well, making it ideal for basking spots.
Just make sure everything is stable – you don’t want your dragon getting squished if something shifts.
Natural Branches and Driftwood
What you need: Branches from your yard (avoid pine, cedar, redwood), oven
How to make it: Find sturdy branches from safe wood types and bake them at 200°F for 30 minutes to kill any bugs or bacteria.
Let them cool completely, then arrange them in the tank as climbing structures or basking platforms.
This is literally free and looks the most natural of any option.

Hide Spots (Because Sometimes Your Dragon Just Can’t Even)
Bearded dragons need places to hide when they’re stressed, too hot, or just want some privacy.
Hides should be on the cool side of the tank and just big enough for your dragon to fit inside comfortably.
Flower Pot Hide
What you need: Terra cotta flower pot, tile saw or strong tool to cut it, sandpaper
How to make it: Cut the flower pot in half to create an arch-shaped hide.
Sand down any sharp edges until everything is smooth – this is super important because rough ceramic can hurt your dragon.
You can leave it natural or paint it with non-toxic, reptile-safe paint.
Food Container Cave
What you need: Plastic food storage container, scissors or craft knife, river rocks (optional), aquarium silicone (optional)
How to make it: Cut a doorway in one side of the container big enough for your beardie to walk through comfortably.
Sand or file down any sharp edges from cutting.
If you want to get fancy, glue river rocks to the outside with aquarium silicone to make it look more natural.
This is probably the easiest hide you can make and costs basically nothing.
Zoo Med Excavator Clay Tunnels
What you need: Zoo Med Excavator Clay (available at most pet stores)
How to make it: Mix the clay according to package directions and shape it into tunnels, caves, and mounds directly in your tank.
When it dries properly, it holds its shape and won’t collapse even when your beardie walks all over it.
This mimics their natural Australian habitat where they dig burrows.
DIY Rock Walls and Backgrounds (For That National Geographic Look)
A cool 3D background makes your tank look professional and gives your beardie more vertical space to explore.
Foam Background Wall
What you need: Foam insulation board, expanding foam spray, box cutter, aquarium sealant, non-toxic paint
How to make it: Measure the back wall of your tank and cut foam board to size.
Use expanding foam to create texture and depth – you can make ledges, caves, and realistic rock formations.
Once the foam is fully cured, carve it with a box cutter to create even more texture and remove any excess.
Seal everything with multiple coats of aquarium sealant, making sure to cover every bit of foam.
Paint with non-toxic paint in desert colors like browns, oranges, and tans.
Let it air out for several days before installing – the fumes from foam and sealant need to completely dissipate.
Feeding Station (Because Bugs Everywhere is Chaos)
A designated feeding area keeps live feeders contained and makes cleanup way easier.
Simple Bowl Setup
What you need: Shallow ceramic dish or small plant saucer, smooth stones to create steps (optional)
How to make it: Use a shallow dish that your beardie can easily walk into – the sides shouldn’t be so high they struggle to reach the food.
You can stack smooth stones around it to create little steps or just leave it simple.
Ceramic works better than plastic because it’s heavier and won’t tip over when your dragon inevitably stands in it.
PVC Feeder Station
What you need: PVC pipe pieces, PVC caps, saw, aquarium silicone
How to make it: Cut PVC pipe into various lengths and angles to create a multi-level feeding platform.
Cap the ends and secure everything with aquarium silicone.
You can make little ledges at different heights for food and water dishes.
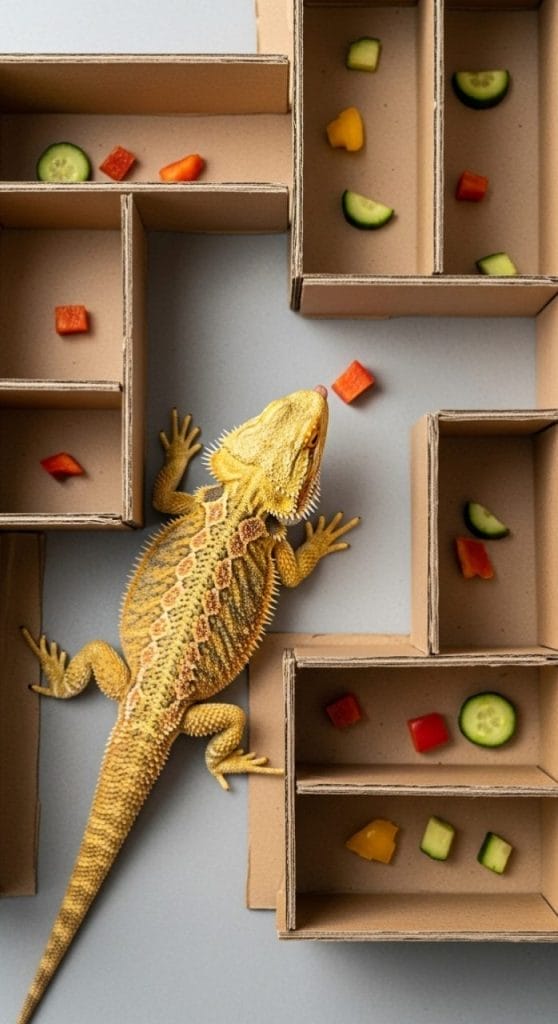
Enrichment Toys and Activities (Because Boredom is Real)
Mental stimulation is just as important as physical habitat setup.
Treat Maze
What you need: Cardboard boxes, scissors, live insects
How to make it: Cut cardboard into a simple maze with multiple paths leading to a treat at the center.
Hide dubias or worms throughout the maze so your beardie has to work for their food.
This mimics natural foraging behavior and gives them something to do besides staring at you judgmentally.
Foraging Box
What you need: Shallow box, play sand or organic topsoil (not treated with chemicals), buried treats
How to make it: Fill a box with safe digging substrate and bury insects or vegetables throughout.
Let your beardie hunt and dig for their food like they would in the wild.
This is especially good for juveniles who have tons of energy to burn.
Obstacle Course
What you need: Cardboard tubes, small boxes, branches, treats
How to make it: Set up a course outside the tank with tunnels to crawl through, obstacles to climb over, and treats at the end.
Let your beardie explore during supervised playtime.
Time them and see if they get faster – some people even race multiple beardies, which is hilarious.
Live Plants (For the Ambitious Keepers)
If you want to level up your tank game, adding live plants creates a more natural environment and can even help with humidity gradients.
Safe Plant Options
Spider plants, hibiscus, and aloe vera are all safe for bearded dragons and can survive in their environment.
Plant them on the cool side of the tank to avoid them getting fried by the basking lamp.
You’ll need a plant grow light (like the Arcadia Jungle Dawn LED) to keep them healthy.
Just remember that bearded dragons will try to eat anything green, so stick with non-toxic plants only.
Cost Comparison: DIY vs Store-Bought
| Item | Store-Bought Price | DIY Cost | Savings |
|---|---|---|---|
| Hammock | $15-25 | $0-5 (old fabric + hooks) | $15-20 |
| Basking Rock | $30-50 | $5-15 (foam board + sealant) | $25-35 |
| Hide Cave | $20-35 | $2-5 (flower pot or container) | $18-30 |
| Background Wall | $50-100+ | $15-30 (foam + sealant + paint) | $35-70 |
| Climbing Branch | $15-30 | $0 (from your yard) | $15-30 |
| Total for Full Setup | $130-240 | $22-55 | $108-185 |
That’s potentially $185 back in your pocket – money you can spend on better quality UVB bulbs, feeders, or literally anything else.
Common DIY Mistakes (Learn From Other People’s Fails)
Not Sealing Wood Properly
Unsealed wood will rot, warp, and grow mold in the humid tank environment.
Always use multiple coats of aquarium-safe sealant and let it cure completely before adding it to the tank.
Making Things Too Heavy
Your DIY rock wall shouldn’t weigh 50 pounds – you still need to be able to clean the tank.
Foam is your friend because it looks like rock but weighs nothing.
Creating Tip-Hazards
Anything that can fall on your beardie needs to be secured properly.
Test everything by pushing on it – if it wobbles or tips, fix it before your dragon tries to climb it.
Using Toxic Materials
When in doubt, Google it and check reptile forums.
The bearded dragon community has tested pretty much every material known to man and will tell you exactly what works and what kills lizards.
Not Letting Things Air Out
Sealants, paints, and foams all need time to off-gas before they’re safe.
48-72 hours minimum in a well-ventilated area before anything goes in the tank.
Maintenance Tips (Because Your DIY Stuff Needs Love Too)
Clean fabric items weekly with reptile-safe disinfectant or just toss them in the washing machine if they’re durable enough.
Inspect everything regularly for wear and tear – hammocks will eventually need replacing, and that’s fine because they cost you basically nothing.
Remove and replace anything that’s fraying, cracking, or showing signs of mold.
Sealed foam and rock items can be wiped down with disinfectant during regular tank cleanings.
Final Thoughts: Your Dragon Doesn’t Know (or Care) How Much You Spent
Here’s the truth – your bearded dragon has no idea whether their hammock came from PetSmart or your sock drawer.
They just know they have a comfy spot to nap, rocks to climb, and places to hide when the world feels like too much.
DIY accessories work just as well as expensive store-bought stuff, and in many cases, they work better because you can customize them exactly how your dragon needs.
Plus, there’s something pretty satisfying about looking at your tank setup and knowing you built half of it yourself with materials you already had lying around.
Your wallet thanks you, your dragon is happy, and you get to tell everyone at the reptile expo that you made everything yourself like some kind of lizard habitat genius.

About Author
Hello, I’m Muntaseer Rahman, the owner of AcuarioPets.com. I’m passionate about aquarium pets like shrimps, snails, crabs, and crayfish. I’ve created this website to share my expertise and help you provide better care for these amazing pets.
Disclaimer
This site is owned and operated by Muntaseer Rahman. AcuarioPets.com is a participant in the Amazon Services LLC Associates Program, an affiliate advertising program designed to provide a means for sites to earn advertising fees by advertising and linking to Amazon.com. This site also participates in other affiliate programs and is compensated for referring traffic and business to these companies.