
This post was created with help from AI tools and carefully reviewed by a human (Muntaseer Rahman) . For more on how we use AI on this site, check out our Editorial Policy.
Check Out These FREE Tools We Made JUST For You!
3 Easy Ways to Draw a Bearded Dragon (Step-by-Step)

Let’s be honest: drawing a bearded dragon sounds cool… until you try and end up with what looks like a sad dinosaur in a wig.
But don’t worry—these three easy techniques will have your reptile looking more like a majestic lizard king and less like a confused gecko.
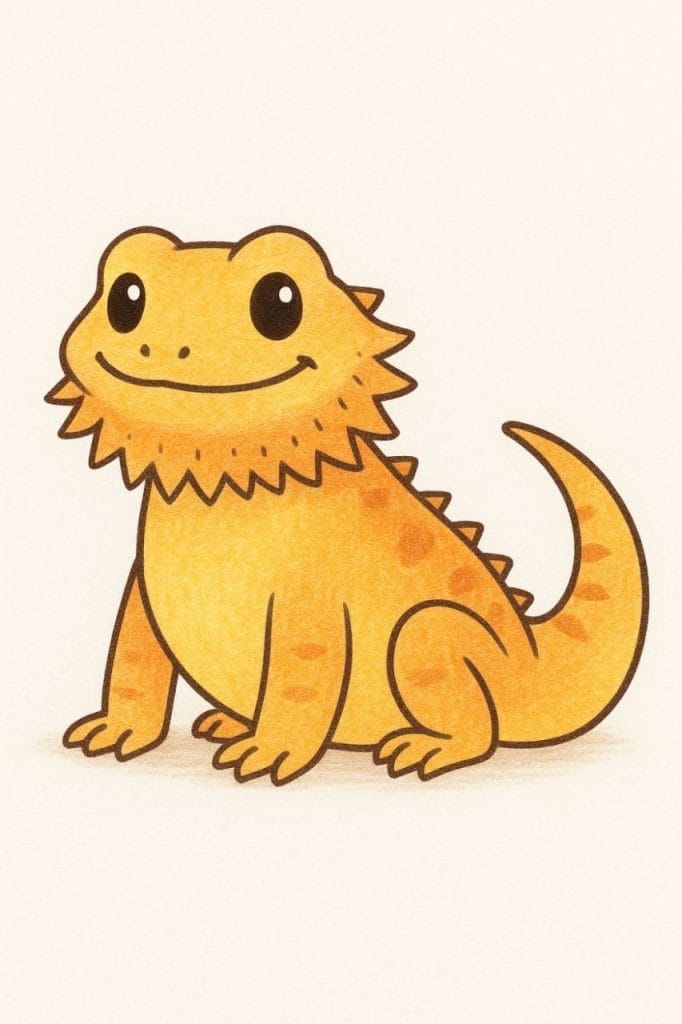
Easy: Cartoon-Style Bearded Dragon
This version is super beginner-friendly. It’s perfect if you’re just starting or want a cute and simple drawing. The shapes are soft and round, and the details are minimal.
Tools You’ll Need
- Pencil
- Eraser
- Black pen or marker (for outlining)
- Colored pencils or crayons (optional)
Step-by-Step Instructions
Step 1: Draw the Head
Start with a rounded triangle shape, kind of like a guitar pick. This is the dragon’s head.
Step 2: Add the Eyes and Smile
Draw two big circle eyes near the top of the head. Add small black dots inside for the pupils. Make the dragon look friendly by giving it a curved smile.
Step 3: Sketch the Body
Below the head, draw a long oval shape sideways. This will be the body. Keep it wide and soft.
Step 4: Add the Legs and Tail
Draw four stubby legs with rounded toes. Then add a curved tail that curls gently to one side.
Step 5: Add Spikes
Now for the beard! Draw small triangle spikes around the chin and back of the head. You can add a few along the back and tail too, but keep them soft—not too sharp.
Step 6: Outline and Color
Use your pen or marker to outline the whole drawing. Once the ink is dry, erase the pencil lines. Color it in however you like—shades of orange, yellow, or even green.
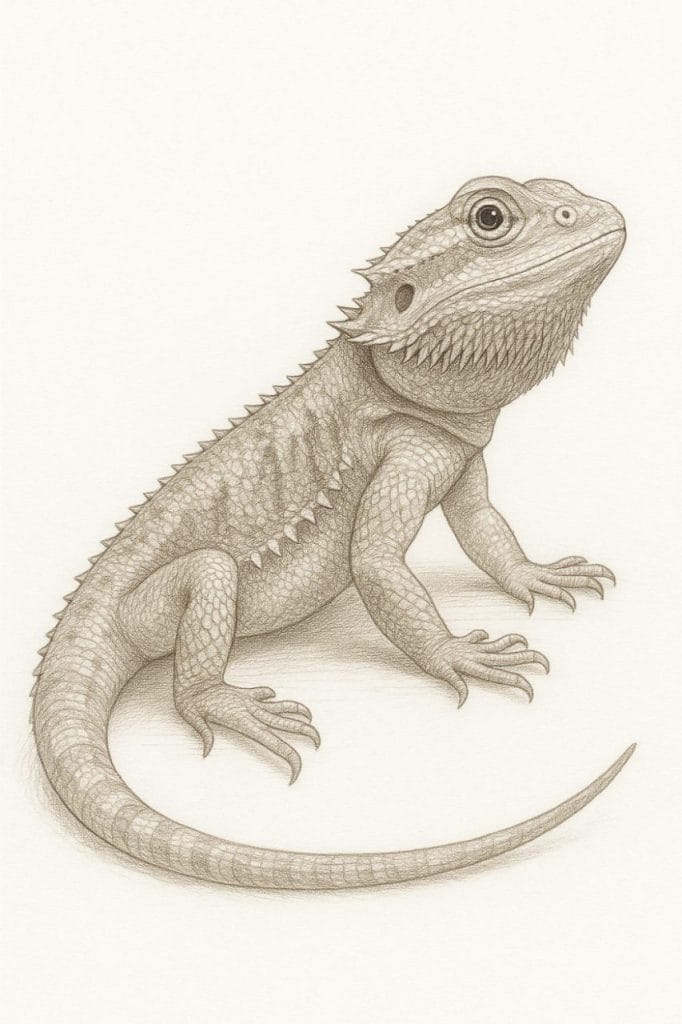
Moderate: Realistic bearded dragon Side View
This version looks more lifelike but still simple enough for casual artists. You’ll start working on proportions, body shape, and a few textures like spikes and rough skin.
Tools You’ll Need
- Pencil
- Eraser
- Fine-tip pen (optional for inking)
- Shading pencil or graphite stick
- Blending stump or cotton swab
Step-by-Step Instructions
Step 1: Sketch the Body Frame
Start with a horizontal oval for the body. Add a smaller oval for the head on the left side. Sketch a long, curved tail coming out from the back.
Step 2: Add Legs and Limbs
Draw the front and back legs. Use simple cylinders or bent rectangles to shape the limbs. Make the toes long with slight curves to show claws.
Step 3: Shape the Head and Snout
Refine the head shape. Give it a slightly pointed snout, with a small curve for the mouth. Add a round eye with a slit pupil and a raised ridge above it.
Step 4: Add Skin Texture and Spikes
Lightly sketch tiny triangles for the spikes along the back and under the chin. Use short dashes to suggest rough skin, especially around the neck and limbs.
Step 5: Shading and Detailing
Start shading under the belly, neck, and sides to add depth. Darken the spikes a bit. Use light, curved strokes to suggest scales without drawing each one.
Step 6: Final Touches
Go over your main lines with a pen if you want to ink it. Use a blending stump or tissue to soften the shadows. Don’t overdo it—keep the textures clean and focused.


Your Beardie Has More to Say…
This article tells you WHAT to do, but do you know WHY your dragon needs it? Or what they’re thinking when you do it wrong?
Read the full rant (all 20 chapters of it) in: “What Your Bearded Dragon Wishes You Knew”
*Told by a very frustrated beardie who’s had ENOUGH of watching you guess.*
Advanced: Full bearded dragon Detail Front Pose
This one’s for when you want to go all in. You’ll draw the bearded dragon facing forward, with full texture—spikes, scales, claws, and attitude.
Tools You’ll Need
- Graphite pencils (HB, 2B, 4B)
- Eraser (preferably kneaded)
- Fineliner pen (optional)
- Blending tool (stump, cotton swab)
- High-quality sketch paper
Step-by-Step Instructions
Step 1: Base Shape and Symmetry
Draw a vertical center line. Sketch the head at the top, shaped like a broad triangle. Below that, draw an oval for the chest and a long tapering shape for the tail. Use guidelines to keep the limbs symmetrical.
Step 2: Facial Features and Eyes
Add two almond-shaped eyes, slightly tilted. Sketch the brow ridges and a short snout with visible nostrils. Place a curved mouth line and add a small beard area under the chin.
Step 3: Front Legs and Posture
Position the front legs wide, almost like the dragon is propped up. Show the elbows, forearms, and each finger clearly, ending in sharp claws. Add small bumps or folds around the joints.
Step 4: Add Spikes and Beard
Now fill in the spiky beard—draw dozens of sharp, slightly curved triangle shapes under the chin and around the sides of the head. Continue spikes down the neck, spine, and tail.
Step 5: Skin Texture and Scales
Focus on areas like the forehead, limbs, and tail. Use tiny overlapping ovals or teardrop shapes for scales. On smoother areas like the belly, use soft, horizontal lines to show folds.
Step 6: Deep Shading and Final Touches
Darken under the chin, arms, and tail. Add cross-hatching in shadowed areas. Highlight edges with the eraser to show light. If you inked it, go back with your pencil for shading on top of the ink.

About Author
Hello, I’m Muntaseer Rahman, the owner of AcuarioPets.com. I’m passionate about aquarium pets like shrimps, snails, crabs, and crayfish. I’ve created this website to share my expertise and help you provide better care for these amazing pets.
Disclaimer
This site is owned and operated by Muntaseer Rahman. AcuarioPets.com is a participant in the Amazon Services LLC Associates Program, an affiliate advertising program designed to provide a means for sites to earn advertising fees by advertising and linking to Amazon.com. This site also participates in other affiliate programs and is compensated for referring traffic and business to these companies.