
This post was created with help from AI tools and carefully reviewed by a human (Muntaseer Rahman) . For more on how we use AI on this site, check out our Editorial Policy.
Check Out These FREE Tools We Made JUST For You!
Create Your Own Betta Fish Plushie With This Free Printable Pattern
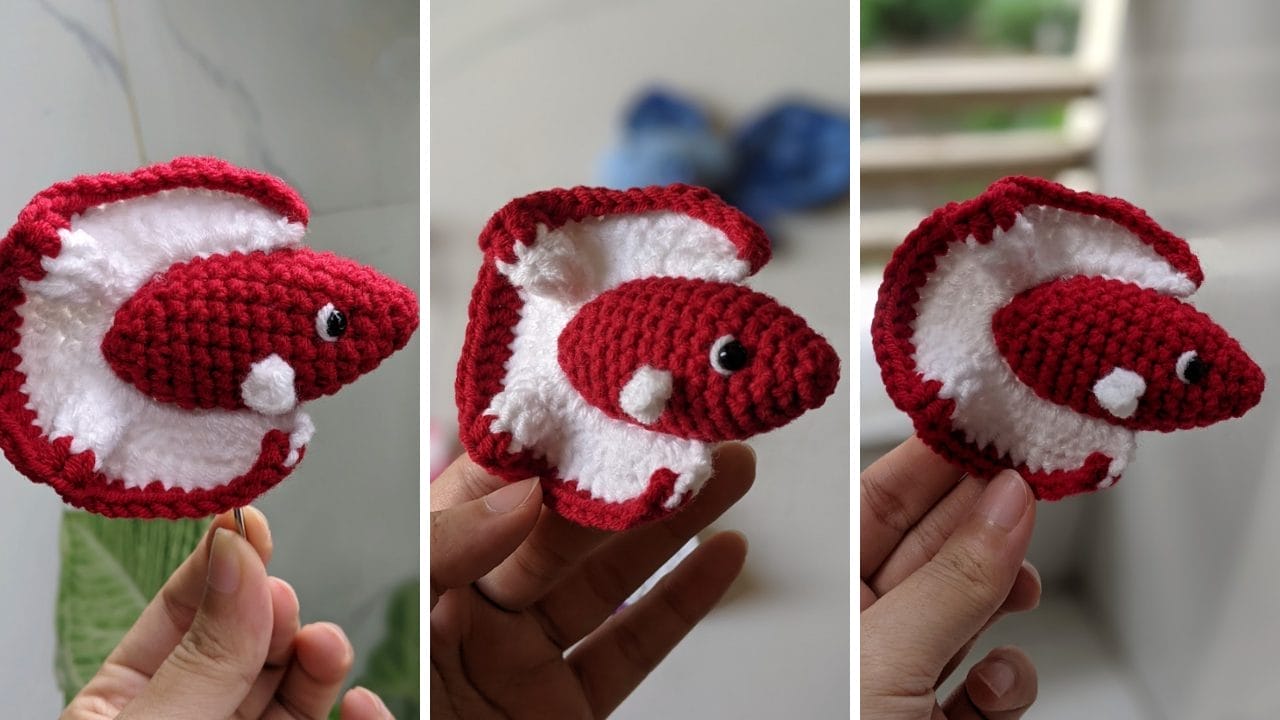
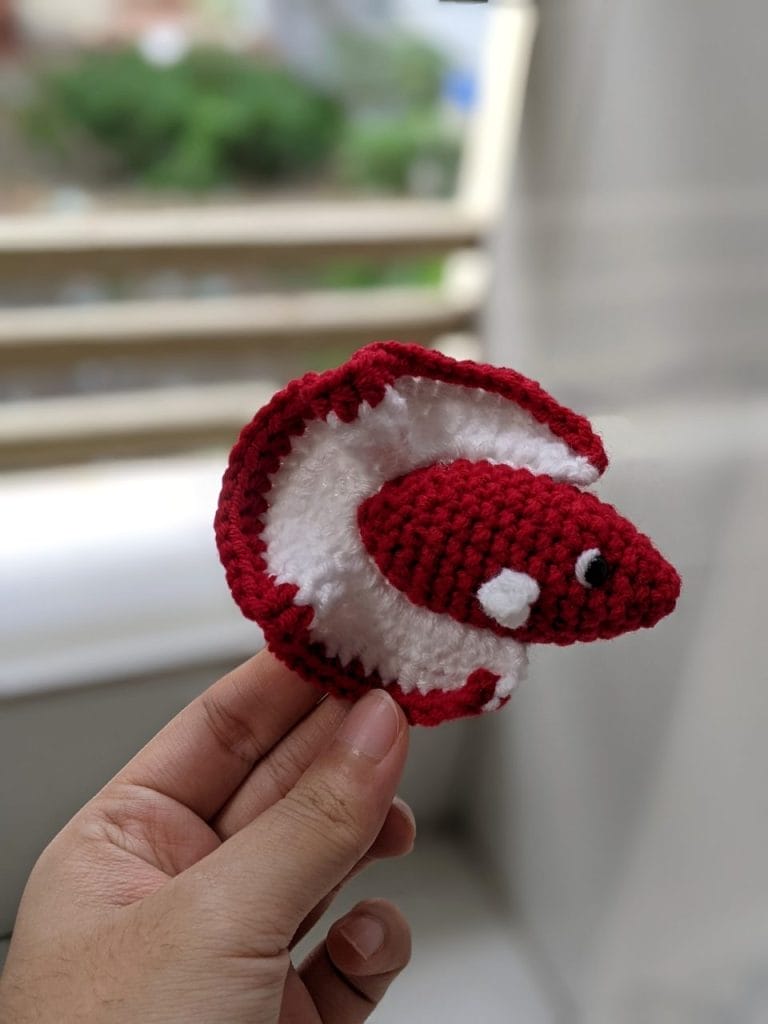
This adorable betta fish plushie captures all the elegance and attitude of the real thing in a perfect 3-inch package.
It’s one of my favorite quick projects – you can easily finish it in one sitting while binge-watching your favorite show.
Love these betta patterns? My complete 5 Betta Fish Crochet Pattern Book includes this design plus four more stunning variations – perfect for creating your own colorful school!
Get Hooked on the Cutest Betta Fish You’ll Ever Make!
What’s Inside?
- 5 Complete Betta Fish Patterns – From simple beginner designs to show-stopping realistic beauties
- Step-by-Step Photo Guides – Because sometimes written instructions just don’t cut it
- Instant Download – Start crocheting in the next 5 minutes
Why I’m Obsessed With This Pattern
I stumbled across this pattern during one of my 2 AM “just one more row” crochet binges (we’ve all been there, right?).
What started as a quick practice project turned into my new favorite thing to make when I need a brain break from bigger projects.
The best part? You can actually finish this in one sitting! I made three of these little guys while binge-watching an entire season of my favorite show.
Project Details (The Practical Stuff)
Skill Level: Beginner friendly (if I can do it half-asleep, you’ve got this!)
Time Required: 2-3 hours (or one really good Netflix binge)
Finished Size: About 3 inches from nose to tail
Fair warning: Mine came out slightly lopsided the first time because I got distracted by a particularly dramatic plot twist
What You’ll Need (AKA My Shopping Excuse)
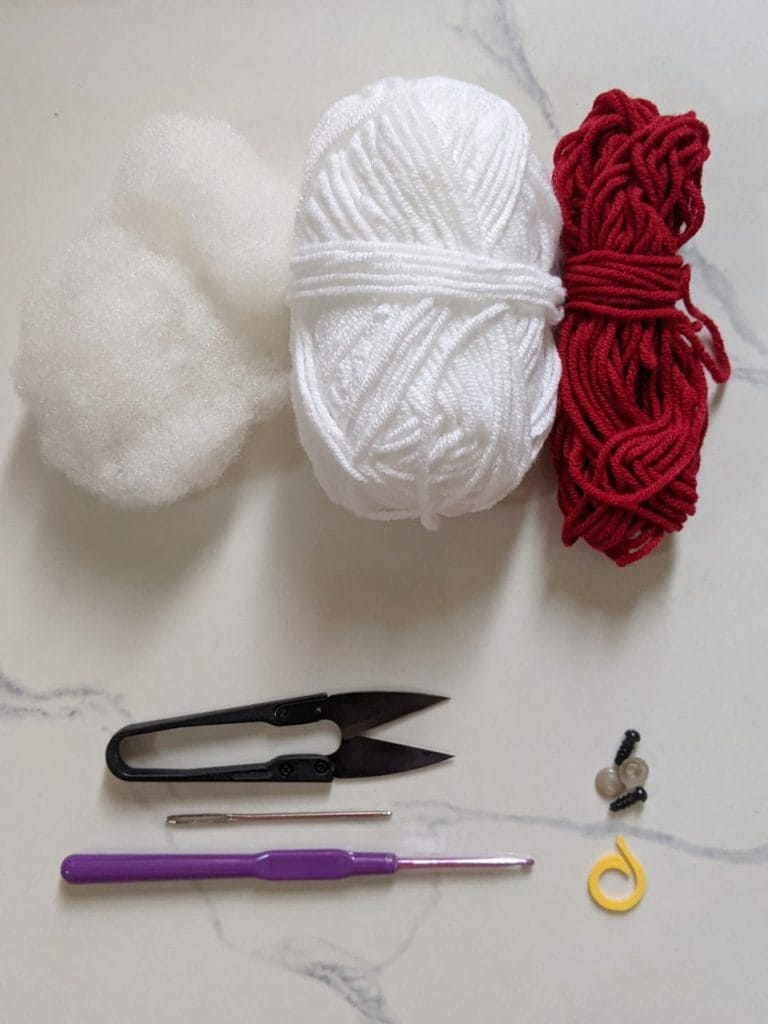
Yarn:
- 4-ply milk cotton yarn in Red and White
- I used whatever was in my stash because let’s be real, who has time for another yarn store trip?
The Essential Tools:
- 3 mm crochet hook (the one that’s probably hiding under your couch cushions)
- Safety eyes (5 mm) – because googly eyes make everything better
- Fiberfill stuffing (I may have “borrowed” some from an old pillow… don’t tell anyone)
- Tapestry needle
- Scissors (the good ones, not the kitchen ones that barely cut butter)
Optional But Highly Recommended:
- Coffee or tea (essential for any crafting session)
- Snacks (crafting burns calories, right?)
- A comfortable chair (your back will thank you later)
Before We Start: The Skills You’ll Need
Don’t panic! This pattern is super beginner-friendly. If you can make a magic ring without crying and do basic single crochet, you’re golden.
I learned most of these stitches from YouTube videos, so if I can figure it out, anyone can.
The only slightly tricky part is the color changes, but honestly, if you mess up, just call it “artistic interpretation” and move on with your life.
Pattern Abbreviations (Because Crocheters Love Their Secret Code)
- MR = Magic Ring (still feels like actual magic to me)
- ch = Chain
- sc = Single Crochet
- inc = Increase (make your circle bigger)
- dc inc = Double crochet increase
- dec = Decrease (make your circle smaller)
- sl st = Slip Stitch
- R = Round/Row
- hdc = Half double crochet
Let’s Make This Fish! (The Fun Part)
Building the Body (Where the Magic Happens)
Grab your red yarn and let’s do this thing!

Quick note: Don’t do the slip stitch and chain thing at the end of each round. Just keep going in a spiral like you’re creating a yarn tornado.
R1: 6 sc in MR [6]
If your magic ring looks more like a magic disaster, don’t worry – mine usually does too
R2: 6 sc [6]
R3: 6 inc [12]
This is where it starts looking less like a sad blob and more like something fish-shaped
R4: 12 sc around [12]
R5: (1sc, 1inc) × 6 [18]
R6-13: 18 sc around [18]
This is the zen part where you just crochet in circles and contemplate life
Eye Time! Stick those safety eyes between rounds 5-6. I always place them, then step back and ask myself, “Does this fish look judgmental?” If yes, adjust accordingly.
R14: (1sc, 1dec) × 6 [12]
Stuffing Break: Time to stuff this baby! I like mine pretty firm – think stress ball, not marshmallow. Pro tip: use the blunt end of your crochet hook to push stuffing into corners. It’s oddly satisfying.
R15: 12 sc around [12]
R16: 6 dec [6]
Pull that yarn tight and close it up! If there’s a tiny hole, don’t stress – fish have to breathe too, right?
The Tail (Where Things Get Fancy)
Switch to white yarn because we’re getting fancy now
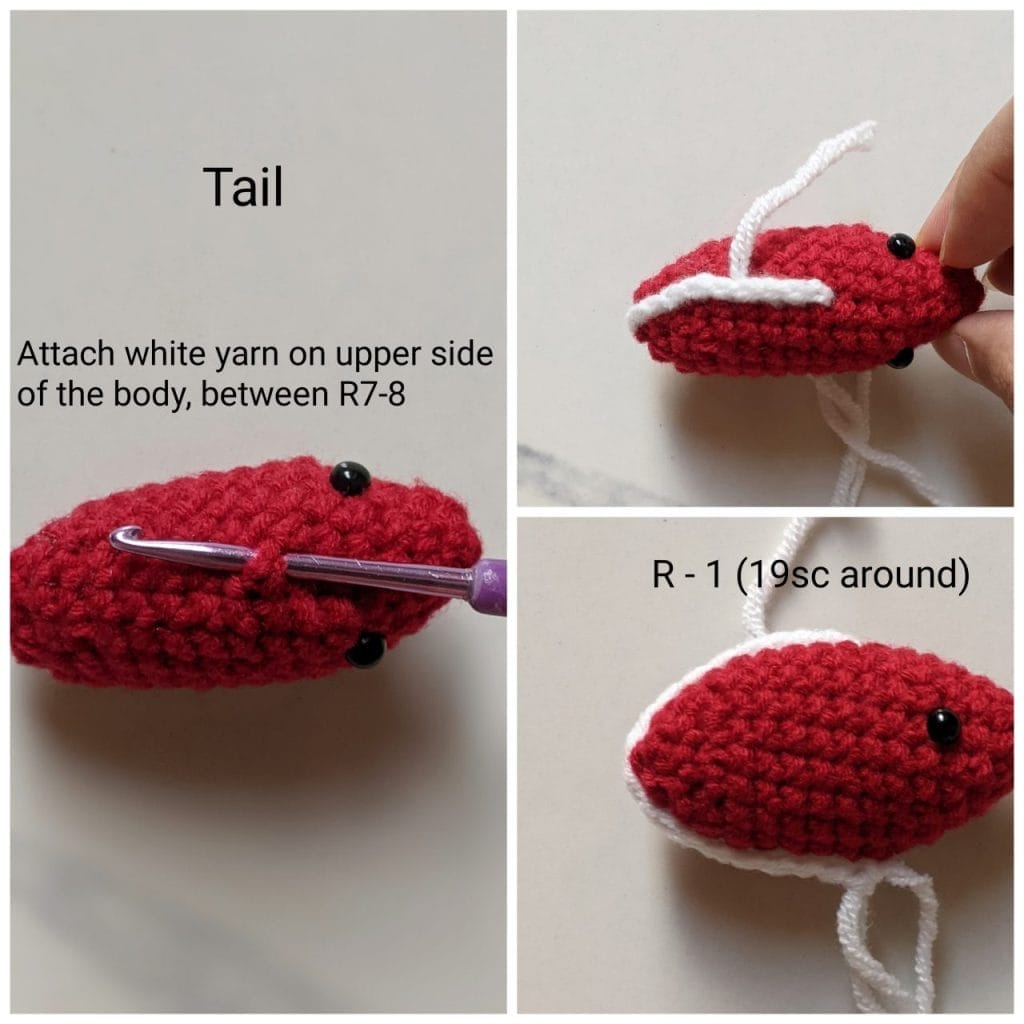
R1: Attach your white yarn to the back of the fish. Work 19 sc around the body (8 on each side, 3 on the back), ch1 and turn [19]
This part felt confusing to me at first, but just think of it like you’re outlining the back end of your fish
R2: 1sc, 1hdc, 15 dc inc in next 15 stitches, 1hdc, 1sc [34]
Here’s where the magic happens and your tail starts looking like an actual tail!
R3: 5sc, 5hdc, 14 dc inc, 5hdc, 5sc [48]
By now you should have something that looks gloriously fishy
Cut that white yarn and grab your red again.
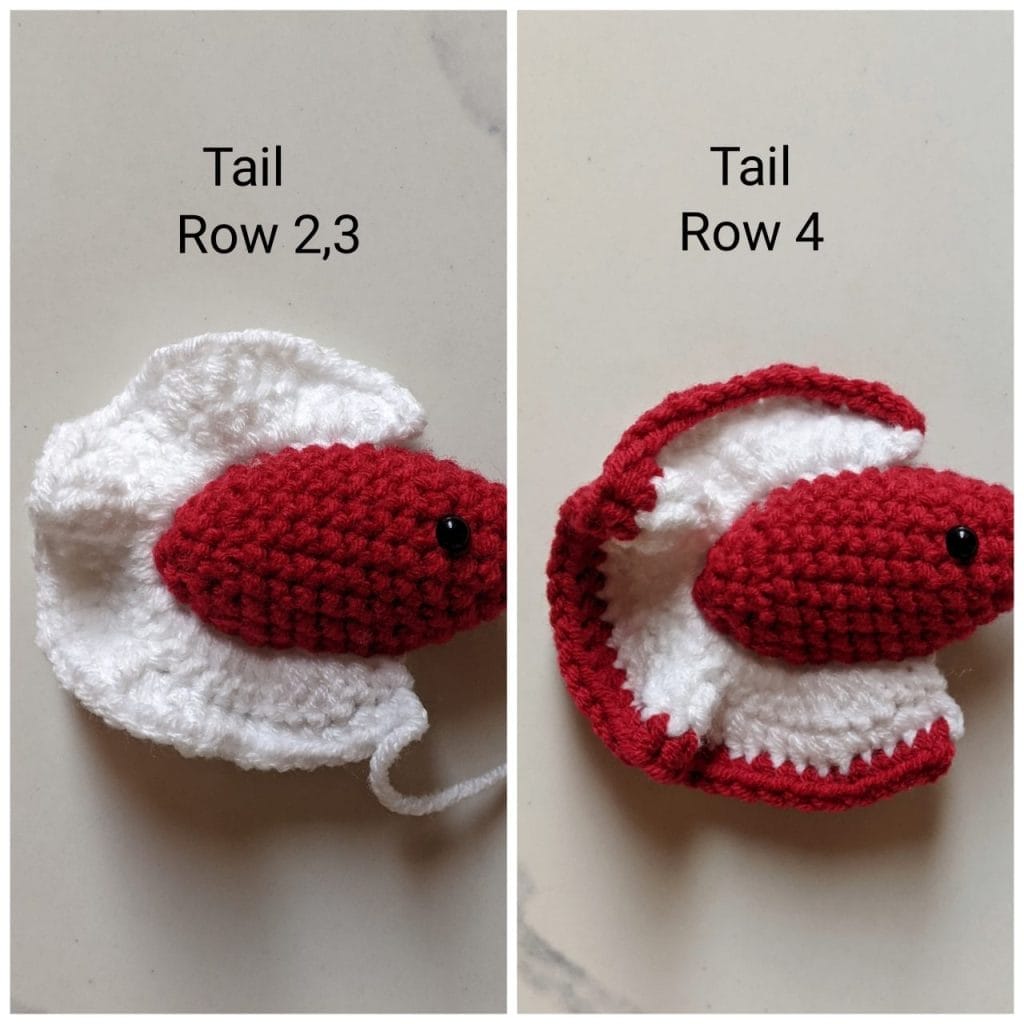
R4: 10sc, 10hdc, 8dc, 10hdc, 10sc
The red edge gives it that classic betta fish look – you know, the fancy ones that cost way too much at the pet store
Tiny Fins (The Cute Details)
Make 2 of these little guys with white yarn

R1: 1sc, 1hdc, 1sc in magic ring, sl st to first stitch
These are stupidly simple but make such a difference! Attach them under the eyes. I use a tiny dab of fabric glue because I’m lazy, but you can totally sew them if you’re feeling ambitious.
The Final Touch-Ups (Making It Perfect)
Add some white highlights next to the eyes with your yarn needle. It’s like giving your fish eyeliner – suddenly it looks way more sophisticated.
Weave in all those pesky yarn tails. I know it’s boring, but future you will thank present you for not having random yarn bits sticking out everywhere.
My Epic Fails (So You Don’t Have To)
The Lopsided Fish Incident: My first attempt looked like it had been in a bar fight. Turns out, consistent tension actually matters. Who knew?
The Overstuffed Disaster: I got a little enthusiastic with the stuffing and created what I can only describe as a fish balloon. Less is more, people!
The Eye Placement Catastrophe: Placed the eyes too close together and created the most judgmental fish in existence. It now lives on my desk and silently critiques my life choices.
Ways to Use Your New Fish Friend
I’ve made about a dozen of these now (it’s becoming a problem), and here’s what I’ve done with them:
- Gave one to my daughter’s teacher (teachers love handmade gifts, right?)
- Scattered them around my desk at work (instant conversation starters)
- Made a whole school in different colors for my bathroom (fish-themed décor is totally a thing)
- Stress relief – they’re perfect for squeezing during Zoom calls
What’s Next? (Because One Fish Is Never Enough)
Once you get the hang of this pattern, you’ll want to make an entire aquarium. Trust me. I’m currently working on a tiny octopus friend for my betta collection because apparently I have no self-control.
Try different color combinations! I made a gorgeous blue and silver one that looks way fancier than it actually is.
Love these betta patterns? My complete 5 Betta Fish Crochet Pattern Book includes this design plus four more stunning variations – perfect for creating your own colorful school!
Get Hooked on the Cutest Betta Fish You’ll Ever Make!
What’s Inside?
- 5 Complete Betta Fish Patterns – From simple beginner designs to show-stopping realistic beauties
- Step-by-Step Photo Guides – Because sometimes written instructions just don’t cut it
- Instant Download – Start crocheting in the next 5 minutes

About Author
Hello, I’m Muntaseer Rahman, the owner of AcuarioPets.com. I’m passionate about aquarium pets like shrimps, snails, crabs, and crayfish. I’ve created this website to share my expertise and help you provide better care for these amazing pets.
Disclaimer
This site is owned and operated by Muntaseer Rahman. AcuarioPets.com is a participant in the Amazon Services LLC Associates Program, an affiliate advertising program designed to provide a means for sites to earn advertising fees by advertising and linking to Amazon.com. This site also participates in other affiliate programs and is compensated for referring traffic and business to these companies.