
This post was created with help from AI tools and carefully reviewed by a human (Muntaseer Rahman) . For more on how we use AI on this site, check out our Editorial Policy.
Check Out These FREE Tools We Made JUST For You!
10 Reef Tank Aquascaping Ideas That’ll Make Your Fish Actually Want to Live There
Look, we’ve all been there. You dump a pile of rocks in your tank thinking you’re creating a masterpiece, only to realize you’ve basically built a rock prison that no fish wants to call home. Your clownfish is hiding behind the heater, and you’re wondering why those Pinterest reef tanks look so much better than yours.
Here’s the thing: aquascaping isn’t rocket science, but it’s also not just throwing rocks in there and hoping for the best.
Let me walk you through 10 reef tank aquascaping ideas that’ll turn your tank from “meh” to “holy cow, is that really yours?” And no, you don’t need a degree in marine biology or the budget of a public aquarium.

The Two Island Setup (Because Sometimes Less Really Is More)
Remember when everyone said you needed 2 pounds of live rock per gallon? Yeah, that was terrible advice.
The two island aquascape is like the minimalist apartment of the reef world – clean, functional, and way easier to maintain than that cluttered mess you had before. You create two separate rock formations with open space between them, and suddenly your tank looks twice as big.
Here’s why it works: Your fish get actual swimming room. Crazy concept, right? Plus, water flow becomes way better because you’re not creating a maze of dead spots where detritus settles like it’s planning to stay forever.
One pro reefer went from 250 pounds of rock in a 120-gallon tank down to 100 pounds in a 225-gallon, and his tank looked better than ever. The corals had room to grow, he could actually clean the back panel, and his nitrates stopped being a constant headache.
How to Build It
Start with your larger island toward one side (not dead center – we’ll talk about that rule of thirds thing later). Build the second island smaller and slightly forward. Leave a channel between them and the back glass for flow and maintenance.
Trust me, future you will thank present you when you’re not trying to scrape algae from behind an immovable rock wall at 11 PM on a Tuesday.
Negative Space Aquascaping (NSA) – The Art of Strategic Emptiness
This sounds fancy, but it’s really just “stop putting so much rock in your tank and let it breathe.”
Negative space aquascaping is about creating open areas that trick your eye into thinking the tank is deeper than it actually is. Instead of a flat wall of rock that screams “I’m looking at a small tank,” you get this sense of vastness that makes people ask if your tank is bigger than it really is.
The technique became huge in the reefing community because people realized their fish weren’t decorative objects – they actually need space to swim. Wild, I know.
The Visual Magic
An NSA setup draws your eye through, around, and beyond the rockwork. Your brain sees the open channels and swim-throughs and thinks “there’s more beyond this,” even though you’re looking at a 50-gallon tank in someone’s living room.
Compare that to the old rock wall style where everything looks squished and two-dimensional, even when you’ve got beautiful corals growing all over it.
Building Your NSA
Use superglue and baking soda (it bonds instantly and rock-hard) or reef-safe mortar to connect broken rock pieces into structures with caves, arches, and overhangs. Keep the base minimal. Build upward and outward in sections.
One reefer said they went through 6 bottles of glue building their NSA. Also, wear good gloves – CA glue burns are no joke. Speaking from experience here.
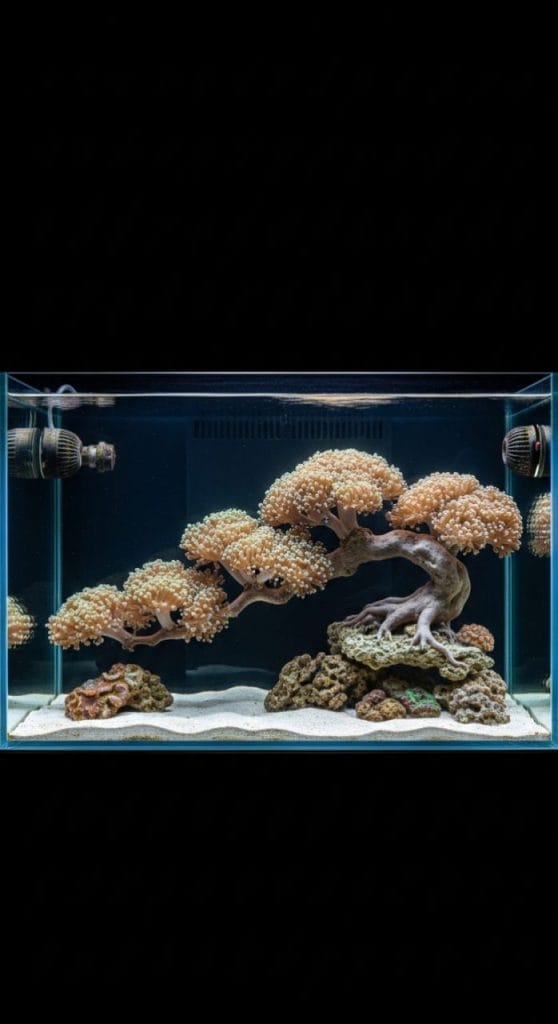
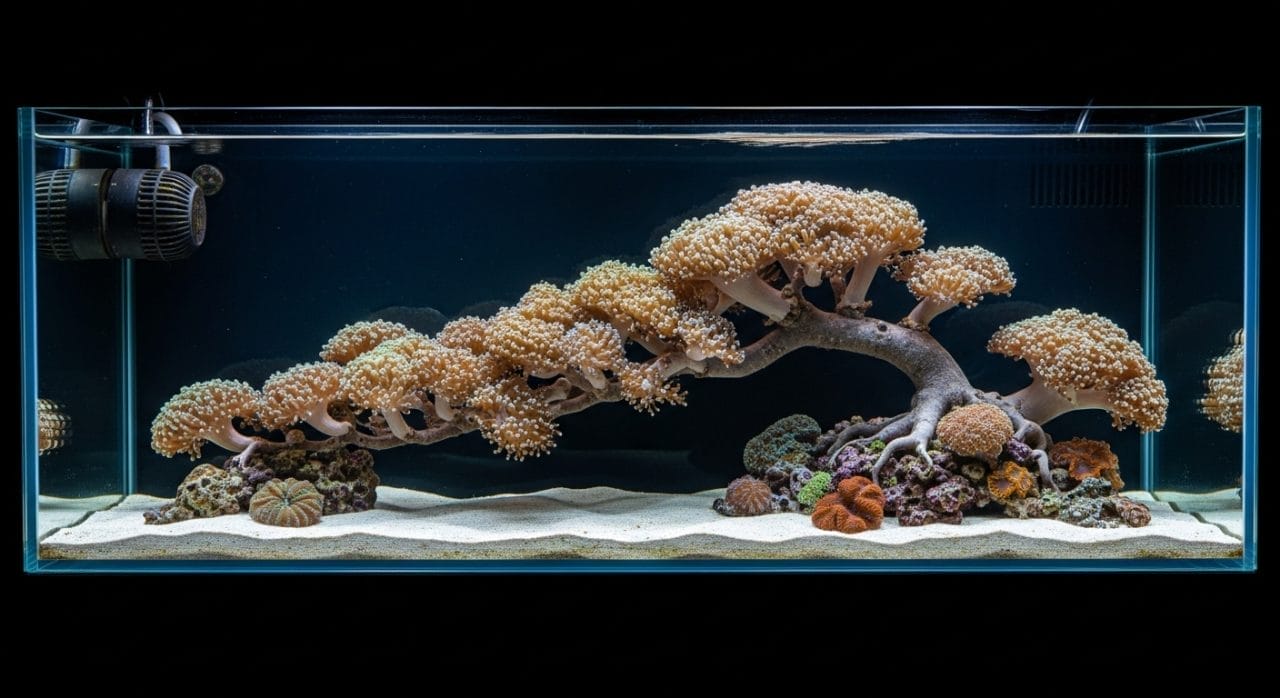
The Bonsai Aquascape (Tiny Trees, Big Impact)
Think of this as the Japanese garden approach to reef tanks.
The bonsai-style aquascape uses minimal rock to create horizontal structures that look like underwater trees. You’re maximizing surface area for corals while keeping the tank open and clean-looking.
This works especially well if you’re going for that “carefully curated” look rather than the “nature took over” vibe. Your hammer corals and frogspawn basically become the leaves of your underwater bonsai, and it’s honestly one of the most unique looks you can pull off.
Why People Love It
Maximum coral placement with minimum rock. Your flow stays strong. Detritus has nowhere to hide. And visitors always ask “how did you do that?”
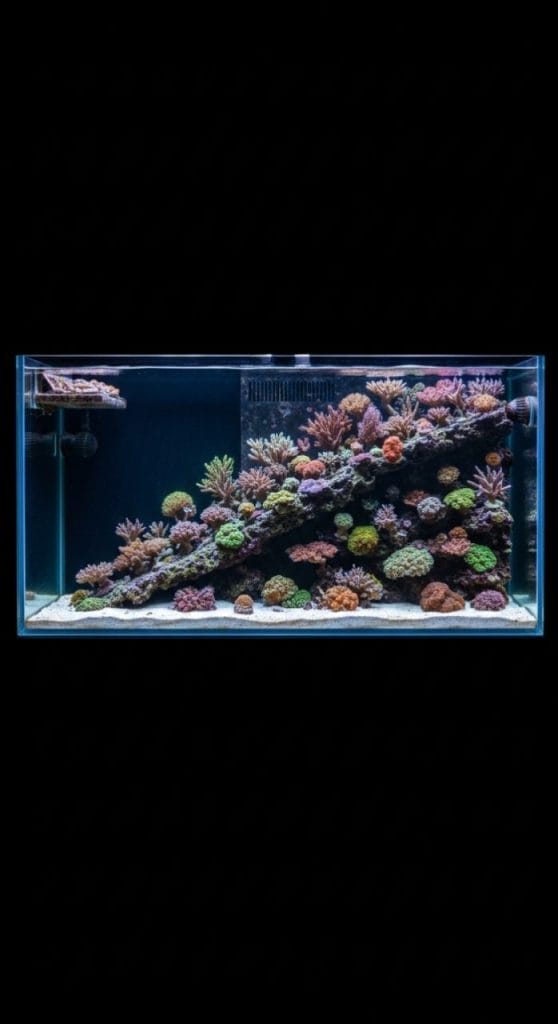
The Canyon/Trench Design (For the Drama Queens)
Want depth? Like, serious depth that makes your tank look like it goes on forever?
The canyon or trench aquascape creates a valley running through your tank, with rock formations rising on either side. It’s like putting a miniature Grand Canyon in your living room, except with clownfish.
This style works best if you’ve got decent front-to-back space in your tank. The sloping rocks and central valley draw the eye inward, creating that illusion of vast space that makes people do a double-take.
The Setup
Slope your rocks from both sides toward a central low point. The valley doesn’t have to be huge – even a 2-3 inch depression creates that depth effect. Place your tallest structures on the thirds lines (more on that below), and let them slope down toward the middle.
Water flow through the canyon? Chef’s kiss. Your fish swimming through it? Even better.

Rule of Thirds Aquascaping (Because Math Actually Helps)
Okay, stay with me here because this sounds complicated but it’s stupidly simple.
Imagine a tic-tac-toe board over your tank. The rule of thirds says put your interesting stuff where those lines cross, not smack in the middle like every amateur does.
Put your tallest rock formation where the upper right and vertical line meet. Place a smaller structure at the bottom left intersection. Suddenly your tank has balance and movement instead of looking like a symmetrical pyramid that screams “I watched one YouTube video.”
Why It Works
This technique tricks your brain into finding the layout more interesting. Your eyes move around the tank instead of staring at one centered blob. It’s the difference between a snapshot and actual art.
Reef photographers and successful reefers swear by this. Every single “wow” tank you’ve ever seen on Instagram probably uses it, even if the owner doesn’t realize it.

The Pillar/Column Layout (Going Vertical)
Perfect for deeper tanks where you want to fill the water column from top to bottom.
The pillar aquascape uses tall, narrow rock structures that rise like underwater skyscrapers. You get multiple levels for different coral types, excellent flow around the pillars, and fish that actually use the whole tank instead of just the bottom third.
Famous tanks like Sanjay Joshi’s 500-gallon setup made this style popular. It looks impressive, provides tons of coral mounting spots, and the vertical structures create natural caves and hiding spots at different heights.
Building Pillars
Start with stable base rocks. Build upward using rock pieces that taper slightly as they rise. Use acrylic rods or reef-safe cement to keep everything stable – you don’t want your pillar becoming a coral-destroying avalanche at 3 AM.
For a standard 72-inch tank, you can fit 2-3 pillars with good spacing between them.

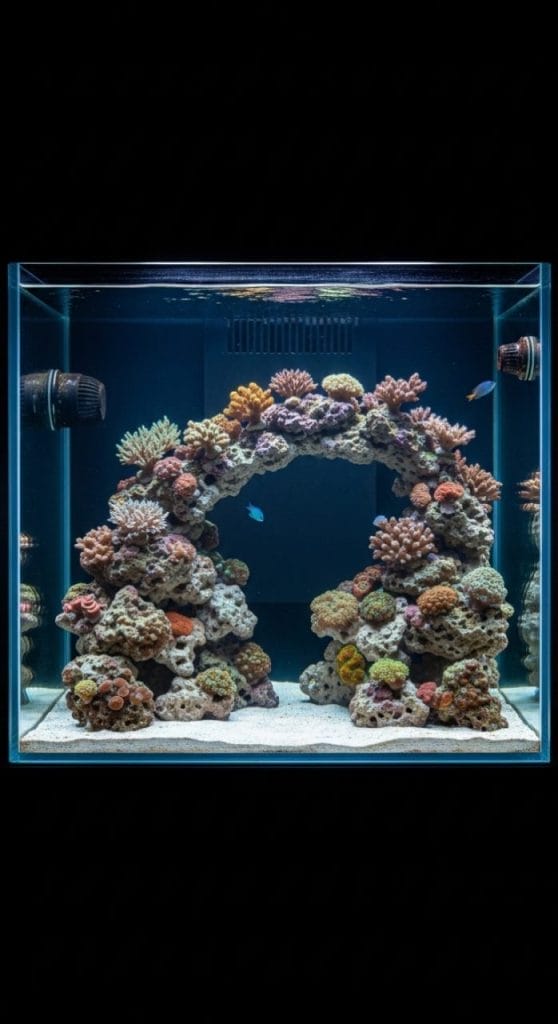
The Floating Island/Arch (Because Physics Is Cool)
This one’s for show-offs, and I mean that in the best way.
The floating island or arch aquascape creates the illusion that your rockwork is suspended in mid-water. You build a massive arch or island structure that spans across the tank, and when corals fill it out, it looks like a floating coral cloud.
It’s visually striking, provides tons of surface area, and once covered in coral, it becomes this living ceiling that fish swim under and through.
The Technical Side
You’re either using acrylic rods drilled through rocks to create the support structure, or you’re building a very stable base that’s hidden by placement and coral growth. Either way, take your time with this one.
The payoff? Worth it. Absolutely worth it.
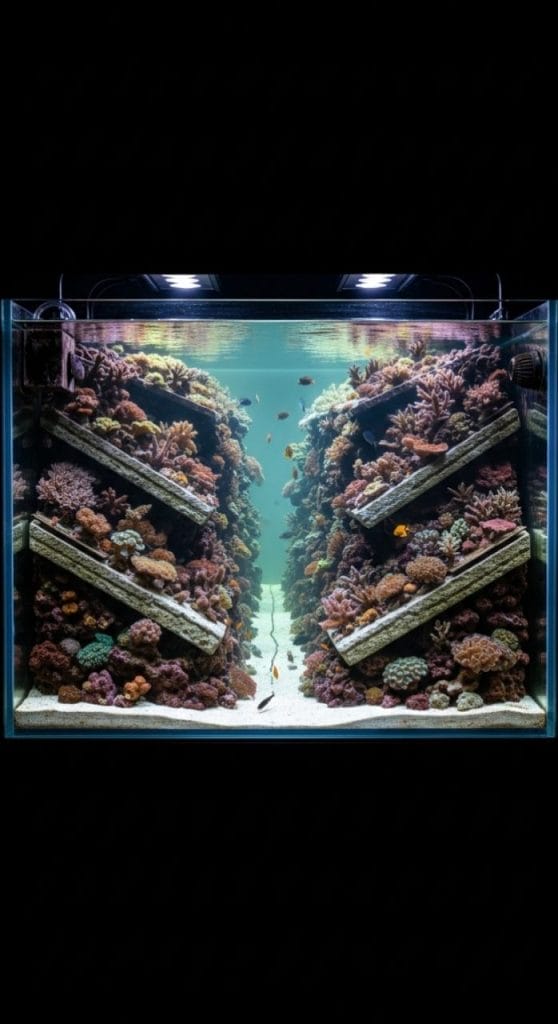
The Shelf/Drop-Off Aquascape (Mimicking Real Reefs)
Ever been diving and seen an actual reef shelf?
The shelf or drop-off aquascape replicates that by creating a plateau at one end of your tank that drops steeply to the sand bed. It’s as close as you’ll get to recreating a real reef wall in your living room.
This gives you different depth zones for corals with different light needs. Your light-hungry SPS goes on top of the shelf. Your LPS and softies live on the drop-off and bottom. Everyone’s happy.
Making It Work
Build up a plateau using flat shelf rock (usually expensive, but worth it). Create a steep slope from the plateau down to your sand bed. The dramatic height change is what makes this work – don’t be shy about it.
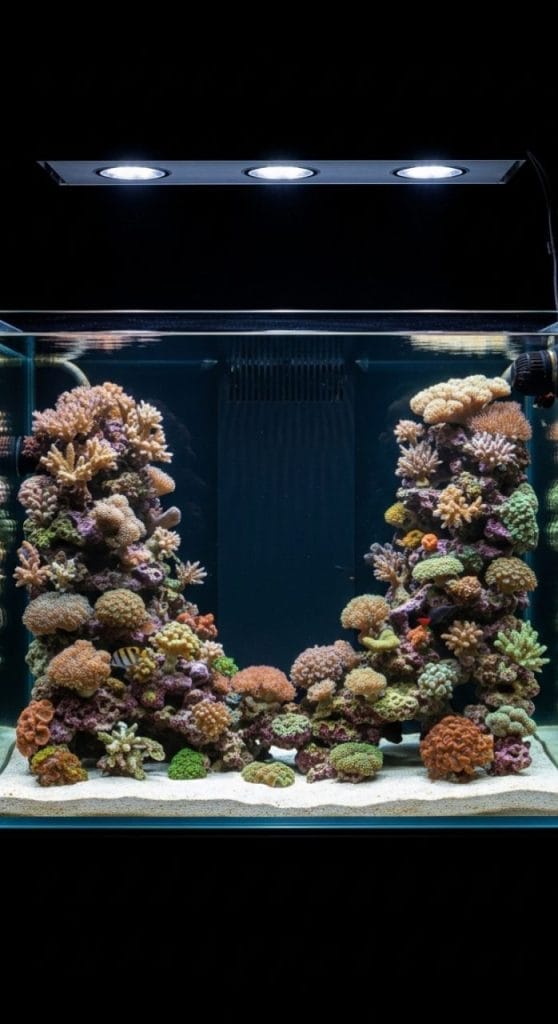
The Horseshoe/Bowl Design (Maximum Hiding Spots)
Great for fish-heavy tanks where you want everyone to get along.
The horseshoe aquascape curves around in a U-shape, creating a bowl effect with a central peak. Fish get hiding spots all around the perimeter, you get easy access to the middle for feeding and maintenance, and it just looks good from any angle.
This design provides tons of caves and overhangs. Shy fish feel secure. Aggressive fish have territories. Your goby has seventeen different places to disappear when you’re trying to count your fish.
The Build
Create your horseshoe base with larger rocks. Build upward in the center to create that peak. Make sure the inner bowl area is accessible – you’ll want to place corals in there, and you need to reach them.
3D-Printed Custom Aquascapes (Welcome to the Future)
Here’s where it gets wild.
3D-printed aquascapes let you design exactly what you want on a computer and then print it in reef-safe materials like ABS plastic or ceramic. Custom shapes, perfect flow patterns, modular pieces that fit your exact tank dimensions – it’s like aquascaping with cheat codes.
Companies like Reef Design Lab and independent makers on Thingiverse are creating everything from nautilus shell structures to modular cave systems. You can even print custom ledges that wrap around your overflow box, turning wasted space into coral real estate.
Is It Reef Safe?
Use white ABS (no toxic pigments) or food-grade PETG. Avoid PLA – it breaks down in saltwater. Ceramic is amazing but more expensive. Resin printing works but most resins aren’t reef-safe, so stick to FDM printing.
The print time? Sometimes a week for large pieces. But the result is a completely unique aquascape that nobody else has.

The Mixed/Hybrid Approach (Why Choose One?)
Plot twist: You don’t have to pick just one style.
Most successful reef tanks actually combine multiple aquascaping techniques. Two islands with an arch connecting them. Pillars with negative space. A canyon with shelf elements.
The key is having a plan before you start gluing rocks together at random.
Planning Your Hybrid
Sketch it out. Seriously, draw your tank from the front and sides. Mark where your overflows are. Figure out where pumps need to go. Plan for coral growth – that single-polyp acropora will be a dinner plate in two years.
Mock up your aquascape outside the tank first. Take photos from different angles. Live with it for a day. Then make changes before anything gets wet.
The Bottom Line on Reef Aquascaping
Here’s what actually matters: Your tank needs to work for both you and your livestock.
The most beautiful aquascape in the world is worthless if your fish are stressed, water flow sucks, or you can’t maintain it without a full teardown every six months.
Start with function. Add beauty. Leave room for growth – both yours and the corals’. And remember that every successful reefer started with a pile of rocks that looked questionable at best.
Your first aquascape probably won’t be perfect. That’s fine. The great part about this hobby? You can always rescape. Just ask anyone who’s done it four times.
Now go build something cool. Your fish are counting on you (they’re just not great at showing it).
5 Saltwater Aquarium Aquascaping Ideas (That Work for FOWLR and Fish-Only Tanks)
Let’s be real: not everyone wants to deal with coral. Sometimes you just want a beautiful saltwater tank with fish that don’t require you to test calcium levels every three days or worry about PAR ratings.
But here’s the problem – most aquascaping advice assumes you’re building a reef. Google “saltwater aquascaping” and you get a million articles about SPS placement and coral growth patterns. Cool, but what if you just want tangs, angels, and maybe a puffer without the coral drama?
Fish-only and FOWLR (fish-only with live rock) tanks need different aquascaping approaches. Your fish actually swim through the tank instead of just picking at coral polyps all day. They need territories, hiding spots, and open water. Your aquascape needs to work harder because you don’t have coral doing the heavy lifting on aesthetics.
Here are 5 saltwater aquarium aquascaping ideas that’ll make your fish-only tank look incredible without a single coral polyp in sight.

1. The Scattered Island Method (Maximum Territory, Minimum Fighting)
You know how your yellow tang and your purple tang keep getting into territorial disputes? Yeah, that’s because you gave them one big rock pile to fight over.
The scattered island approach spreads multiple smaller rock formations across your tank bottom instead of one massive structure. Think archipelago, not continent.
Each island becomes a separate territory. Your tangs, angels, and wrasses can claim their own space without constantly bumping into each other. Aggression drops. You can actually keep multiple similar species without them turning your tank into an MMA cage.
Why It Works for Fish-Only
Reef tanks often prioritize vertical space for coral placement. Fish-only tanks need horizontal separation. Your purple tang can own the left island, your yellow tang takes the right, and suddenly they’re neighbors instead of roommates sharing a studio apartment.
The open sand between islands? That’s swimming space. Your fish will actually use the middle of the tank instead of just hugging the rockwork.
How to Build It
Use 3-5 separate rock formations depending on your tank size. In a 75-gallon, three islands work perfectly. Space them at least 8-10 inches apart – you want clear separation.
Each island should be 8-15 pounds of rock, built upward but not crazy tall. Create caves and overhangs at different heights. Your fish need hiding spots at the base and resting spots mid-level.
Pro tip: Don’t place islands dead center. Offset them using that rule of thirds thing. Your tank will look intentional instead of random.

2. The Back Wall Theater (Depth Without the Clutter)
This one’s for people who want their fish to be the stars, not the rocks.
The back wall aquascape stacks all your rock against the back glass, creating a dramatic vertical backdrop while leaving the front and middle completely open. It’s like theater staging – the rock is the set, your fish are the actors.
I’ve seen 125-gallon tanks with this setup that looked like they had twice the water volume because there was nothing obstructing the view. Your fish swim in open water while still having that entire back wall as territory and hiding spots.
The Visual Impact
When someone walks up to your tank, they see fish swimming in clear water with this impressive rock wall behind them. No rocks blocking the view. No trying to peek around formations to see your favorite fish. Just clean, unobstructed viewing.
This works especially well for larger, active fish. Tangs, triggers, angels – they look amazing against a solid backdrop while they cruise around open water.
Building the Wall
Start with larger base rocks against the back glass. Build upward in sections, creating caves, ledges, and hiding spots throughout. You want depth variation – some rock jutting forward, some recessed – so it doesn’t look like a flat wall.
Leave 1-2 inches between the rock and glass for flow and maintenance access. Future you will appreciate not having to dismantle the entire aquascape to scrape the back panel.
Height-wise, go as tall as you want. In a fish-only tank, you’re not worried about light penetration for coral. Stack those rocks to the water line if it looks good.
Warning: Make absolutely sure this thing is stable. Use reef-safe epoxy or mortar between layers. A 50-pound rock wall collapsing at 2 AM is nobody’s idea of a good time.

3. The Center Stage Formation (Bold and Unapologetic)
Everything you’ve read says “don’t center your aquascape.” Yeah, well, sometimes rules are meant to be broken.
The center stage aquascape puts one dramatic rock formation right in the middle of your tank, builds it tall and impressive, and makes it the obvious focal point. It’s bold. It’s symmetrical. It works.
This is the aquascaping equivalent of putting a fountain in the center of a plaza. It draws the eye. It creates a central hub where fish congregate. And when you build it with caves and swim-throughs, your fish interact with it constantly.
Why It Actually Works
In a reef tank, centered aquascaping can look amateurish because coral grows outward and makes everything feel cramped. In a fish-only tank? You’re not adding coral mass. The rock stays the rock.
Your fish swim around the formation in circular patterns. Schooling fish like chromis or anthias orbit it. Larger fish cruise past it. There’s constant movement that makes the centered formation look intentional and dynamic.
Building Your Centerpiece
This needs to be stable as hell. Use a large base rock (20-30 pounds for a 75-gallon tank). Build upward with progressively smaller rocks, creating an interesting silhouette.
Make it tall – at least two-thirds of your tank height. Create swim-throughs at different levels. Your wrasses and gobies will use every cave and opening you create.
Leave at least 6-8 inches of clear space around the entire formation. The negative space makes the centerpiece pop and gives your fish room to swim around it.

4. The Minimalist Islands (Less Rock, More Impact)
Remember when everyone said you needed 1-2 pounds of live rock per gallon? That advice has aged like milk.
The minimalist island approach uses maybe 30-40 pounds of rock in a 75-gallon tank. Two or three carefully placed formations with tons of open space between them.
This is the opposite of those old-school FOWLR tanks that looked like rock quarries. You’re creating intentional, clean structures that give fish what they need without cluttering the tank.
The Philosophy
Your fish don’t need 100 pounds of rock. They need strategic hiding spots, some territorial boundaries, and open swimming space. The minimalist approach gives them exactly that and nothing extra.
Water flow improves dramatically. You can actually see the back of your tank. Maintenance becomes way easier. And honestly? It looks more modern and intentional than the “pile of rocks” aesthetic.
Making It Work
Choose your rock carefully. You want interesting shapes with natural caves and texture. Two well-chosen 20-pound rocks will look better than eight generic 5-pound chunks.
Create negative space deliberately. If you’ve got three islands, place them in a triangle formation with maximum spacing. Your eye connects them into a cohesive layout while your fish use all that open water.
This style works best with active, open-water fish. Tangs, chromis, anthias, larger angels – they’ll use every inch of that swimming space.

5. The Cave System (For the Hide-and-Seek Champions)
Some fish are shy. Some are nocturnal. Some just like having seventeen different hiding spots for reasons only they understand.
The cave system aquascape prioritizes creating multiple interconnected caves, overhangs, and hiding spots throughout your rock structure. You’re building an underwater cave network that gives shy or territorial fish the security they need.
This works incredibly well for tanks with eels, lionfish, groupers, hawkfish, or any species that likes to post up in a cave and watch the world go by.
Building the Network
Use larger rocks with natural hollows as your foundation. Connect them with flat shelf pieces to create roofs and overhangs. The goal is multiple entry/exit points for each cave – fish feel safer when they have escape routes.
Vary the cave sizes. Small gaps for gobies and blennies. Medium caves for clowns and damsels. Larger caverns for bigger fish or shy species.
Stack rocks to create different levels. A cave at the bottom, another mid-tank, maybe one near the surface. Fish will claim different caves based on their preferences and the pecking order.
The Technical Details
Use reef epoxy or mortar to secure everything. Cave systems can get top-heavy if you’re not careful. You don’t want a collapse that traps a fish or destroys your tank’s seam.
Leave space behind and beside your cave system for flow. Water needs to circulate through the caves, not create dead spots where detritus accumulates.
Test stability by gently pushing on your structure before adding water. If it wobbles, fix it now. Once it’s underwater with fish, restructuring becomes a nightmare.
Mixing Styles for Your Specific Tank
Here’s the secret: you don’t have to pick just one approach.
The best fish-only aquascapes often combine elements from multiple styles. Back wall with scattered islands in front. Center stage with a cave system. Minimalist islands that are actually elaborate cave structures.
Consider Your Fish First
Aggressive, territorial fish? Scattered islands give them space to spread out.
Shy or nocturnal species? Cave system priority.
Active schooling fish? Minimalist or back wall for maximum swimming room.
Mix of everything? Hybrid approach with different zones for different behaviors.
Plan Before You Build
Sketch your tank from multiple angles. Mark where equipment goes. Consider how fish will interact with each section.
Mock it up outside the tank. Dry-fit everything. Take photos. Live with it for a day or two. Then make changes before water gets involved.
Function Comes First
The prettiest aquascape means nothing if your fish are stressed, your flow is blocked, or you can’t clean the tank without a full teardown.
Water circulation through and around your rockwork matters more than you think. Dead spots collect waste. Waste spikes nutrients. Nutrients cause algae. Algae makes your beautiful aquascape look like a green nightmare.
Leave maintenance access. You need to reach the back glass. You need to siphon the sand bed. You need to grab that rock with bubble algae before it spreads to seventeen other rocks.

About Author
Hello, I’m Muntaseer Rahman, the owner of AcuarioPets.com. I’m passionate about aquarium pets like shrimps, snails, crabs, and crayfish. I’ve created this website to share my expertise and help you provide better care for these amazing pets.
Disclaimer
This site is owned and operated by Muntaseer Rahman. AcuarioPets.com is a participant in the Amazon Services LLC Associates Program, an affiliate advertising program designed to provide a means for sites to earn advertising fees by advertising and linking to Amazon.com. This site also participates in other affiliate programs and is compensated for referring traffic and business to these companies.