
This post was created with help from AI tools and carefully reviewed by a human (Muntaseer Rahman) . For more on how we use AI on this site, check out our Editorial Policy.
Check Out These FREE Tools We Made JUST For You!
How to Draw a Betta Fish: Easy Sketches, Pencil Art, and Step-by-Step Ideas
Betta fish are like swimming works of art. Their flowing fins, bold colors, and unique shapes make them one of the most fun fish to draw.
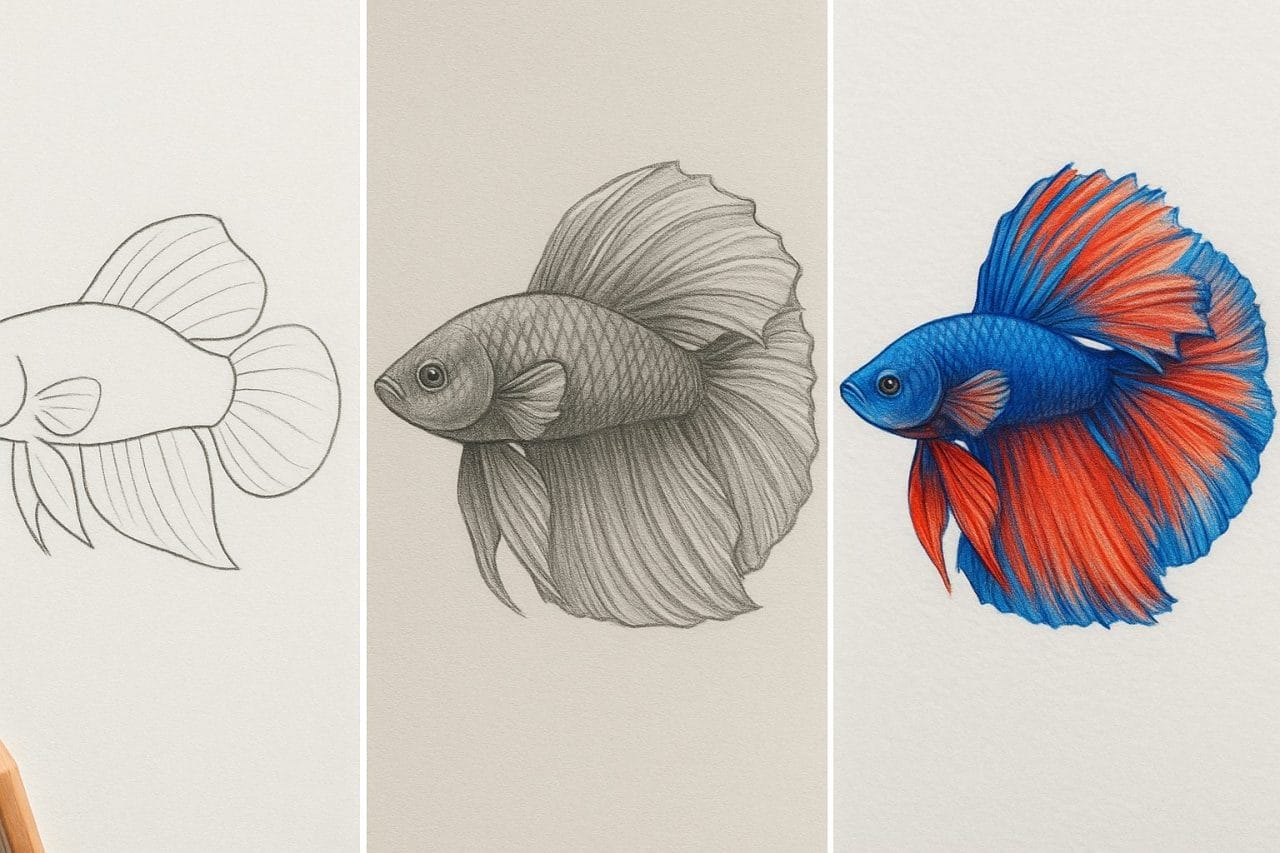
In this guide, I’ll show you how to draw a betta fish in three different ways—an easy sketch for beginners, a pencil-shaded version for more detail, and a full-color drawing if you’re ready for a challenge.
Grab your pencils, and let’s start sketching!

1. Simple Betta Fish Sketch (Beginner-Friendly)
Materials Needed
You don’t need much to get started. Just gather:
- A regular pencil (HB is fine)
- An eraser
- A sharpener
- Plain white paper
Optional:
- Black pen or fine liner (for outlining after sketch)
Step-by-Step: Simple Betta Fish Sketch
Step 1: Draw the Body Shape
Start by lightly sketching an oval for the body. Make one end slightly pointed—that will be the fish’s face.
Step 2: Mark the Head and Eye
Add a small circle near the pointed end for the eye. Lightly draw a curved line from the top of the eye to shape the head.
Step 3: Sketch the Tail (Caudal Fin)
From the back end of the oval, draw a big fan shape. It should spread out like a flowing curtain. Use wavy, loose lines to show the movement of water.
Step 4: Draw the Dorsal and Anal Fins
On top of the body, sketch the dorsal fin like a soft hill. Below the body, mirror it with the anal fin. These should also have wavy edges, not straight lines.
Step 5: Add the Pectoral Fins
Draw two small fins near the head, one on each side. They look like little soft triangles or rounded leaves.
Step 6: Lightly Clean the Lines
Erase extra sketch lines so the shape looks clean. You can darken the main lines now with your pencil.
Step 7 (Optional): Outline with Pen
Go over the final lines using a black pen or fine liner. Let the ink dry, then erase the pencil marks underneath.
This sketch won’t take long—maybe 5 to 10 minutes.
And you don’t need to worry about it being perfect. The goal is to get comfortable drawing the basic shapes.
2. Pencil Shaded Betta Fish (Intermediate Level)
Materials Needed
You’ll need a few more tools than the beginner sketch:
- HB pencil for outlines
- 2B or 4B pencil for shading
- Eraser (regular and kneaded if possible)
- Blending stump or soft tissue
- Smooth white drawing paper

Step-by-Step: Pencil Shaded Betta Fish
Step 1: Light Sketch of the Body
Start by sketching a teardrop or oval shape for the body. Keep your lines light—these are just guides.
Step 2: Shape the Fins and Tail
Add the dorsal (top), anal (bottom), and caudal (tail) fins. Make the lines flow outward in soft, wavy motions. These fins should look large and delicate.
Step 3: Define the Head and Face
Draw a curve near the pointed end of the body to separate the head. Add the eye—a small circle near the front. You can also mark the gill area with a soft curved line.
Step 4: Start Light Shading on the Body
Use a 2B pencil to add light shading to the fish’s body. Shade in the direction of the body curve. Keep the darkest area along the spine or bottom edge for depth.
Step 5: Add Texture to the Fins
Switch to a softer pencil (like 4B). Draw thin lines from the base to the tip of each fin to show the flow. Blend softly between these lines to make the fins look layered and smooth.
Step 6: Deepen Shadows and Contrast
Add more pressure to the shadow areas—under the fins, along the belly, and around the eye. Use a blending stump or soft tissue to smooth out the shades. Erase some small areas lightly to bring out highlights.
Step 7: Final Touches
Clean up the edges with an eraser. Darken the outline of the fish carefully without overdoing it. Make sure there’s a good balance of light and dark across the drawing.
This style adds a nice 3D look without needing color. Take your time with shading—it makes all the difference here.
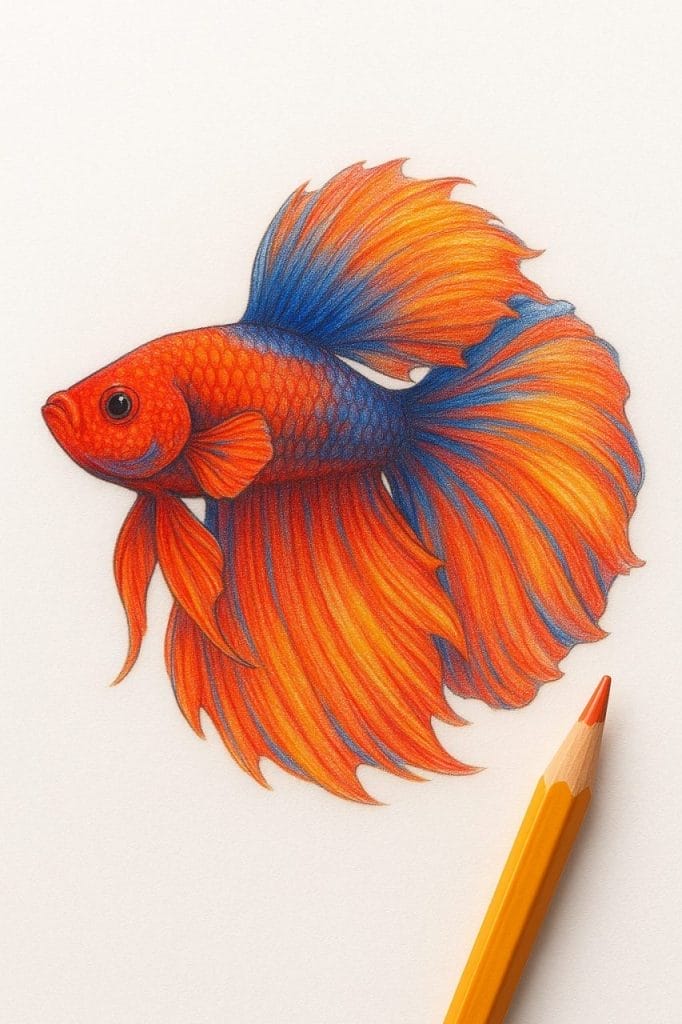
3. Detailed Colored Betta Drawing (Advanced)
Materials Needed
This one needs more tools and patience:
- HB pencil (for sketching)
- Colored pencils or watercolor paints
- Blending pencil or colorless blender (if using colored pencils)
- Eraser (kneaded or regular)
- Fine-tip pen (optional for outlines)
- Smooth, thick paper that can handle layers or light washes
Step-by-Step: Detailed Colored Betta Drawing
Step 1: Light Sketch of the Fish
Begin with a basic outline. Draw the body shape as a teardrop with the pointed end facing forward.
Sketch the fins with flowing, dramatic curves. Keep your pencil strokes light—you’ll build on this later.
Step 2: Mark Key Fin Rays and Body Details
Lightly draw lines inside the fins to show their natural structure. Add small curves for scales or subtle texture on the body. Draw the eye with a circular shape and leave a tiny highlight space.
Step 3: Choose a Realistic Color Pattern
Pick a real betta color type like Halfmoon, Koi, or Mustard Gas. This helps guide which colors to use and where to place them. Plan your palette before starting.
Step 4: Start Coloring the Body
Use light, even layers with colored pencils. Start with a base color, then build up shadows and highlights gradually.
Use darker shades under the belly and lighter shades near the top. If using watercolor, apply light washes and let each layer dry.
Step 5: Color the Fins
Fins should look soft and flowing. Use long, sweeping strokes in the direction of the fin rays.
Blend two or three colors for depth—like a gradient from red to orange, or blue to white. Add shadows where the fin meets the body.
Step 6: Deepen Details
Add scale texture with small, curved strokes if using pencils. Use a fine-tip pen or very sharp pencil for fin edges and scale outlines. Darken the eye and add contrast around it.
Step 7: Blend and Polish
Use a colorless blender pencil or layer with white to soften any harsh spots. Use the eraser to lift highlights where needed.
Add final touches—more contrast, brighter tips, or deeper shadows.
This style can take 1–2 hours or more depending on the detail. Don’t rush—let the colors layer slowly.
And always work from light to dark to avoid muddy tones.

About Author
Hello, I’m Muntaseer Rahman, the owner of AcuarioPets.com. I’m passionate about aquarium pets like shrimps, snails, crabs, and crayfish. I’ve created this website to share my expertise and help you provide better care for these amazing pets.
Disclaimer
This site is owned and operated by Muntaseer Rahman. AcuarioPets.com is a participant in the Amazon Services LLC Associates Program, an affiliate advertising program designed to provide a means for sites to earn advertising fees by advertising and linking to Amazon.com. This site also participates in other affiliate programs and is compensated for referring traffic and business to these companies.