This post was created with help from AI tools and carefully reviewed by a human (Muntaseer Rahman) . For more on how we use AI on this site, check out our Editorial Policy.
Check Out These FREE Tools We Made JUST For You!
12 Free Crochet Fish Patterns: Betta, Goldfish, Koi, Clownfish & More

Crochet fish are the aquarium you never have to do a water change on.
No heater, no cycling, no 3am panic when the filter starts making a noise. Just yarn.
The catch is that searching “free crochet fish pattern” throws up a wall of results, and a big chunk of them are scraped reposts sitting on ad-stuffed sites with rounds copied wrong. You get halfway through a fin and the stitch counts stop adding up.
So this list is only patterns that actually exist, are actually free, and live on the site of the person who designed them. Three of them are ours, made by a real crocheter and photographed step by step. The other nine we checked one at a time.
There is a fish here for every mood: a realistic betta with flowing fins, a koi that takes a whole evening, a no-sew angelfish you can finish in under an hour, and a drawstring bag you can actually carry.
Quick Pick: Which Fish Should You Make?
If you just want to grab a hook and start, use this.
| Pattern | Type | Finished Size | Hook | Sew? | Skill |
|---|---|---|---|---|---|
| Realistic Betta Fish | Amigurumi | Palm-sized | 3.5 mm | Sewn | Intermediate |
| Purple Betta Amigurumi | Amigurumi | 4.5 in | 3.5 mm | Sewn | Advanced beginner |
| Goldfish | Amigurumi | 3 in | 3 mm | Sewn | Beginner |
| Clownfish | Amigurumi | 5 in (13 cm) | 3 mm | Sewn | Beginner friendly |
| Koi Fish | Amigurumi | 10 in | 4 mm | Sewn or glued | Easy, lots of color changes |
| Angelfish | Amigurumi, no-sew | Keychain-sized | 5 mm (H) | No-sew | Confident beginner |
| Pufferfish | Amigurumi | 4.3 in wide | 3 mm | Sewn | Beginner |
| Bass Fish | Amigurumi | 7 in | 4 mm | Sewn or glued | Easy |
| Betta Fish in a Jar | Display piece | 3.5 in | 3.5 mm | Sewn | Intermediate |
| No-Sew Jellyfish | Keychain | 4 in (10 cm) | 2.5 mm | No-sew | Beginner |
| Sheldon the Shark | Amigurumi | 5 in long | 4 mm (G) | Sewn | Advanced beginner |
| Fish Drawstring Bag | Bag | Customizable | 4.5 mm | Light sewing | Beginner |
Want the fastest win? The no-sew angelfish. Under an hour, nothing to assemble.
Want the one that looks like a real fish? The realistic betta or the koi.
Want something you will actually use? The bag, the jellyfish keychain, or the betta in a jar.
1. Realistic Betta Fish (Free Pattern, Ours)
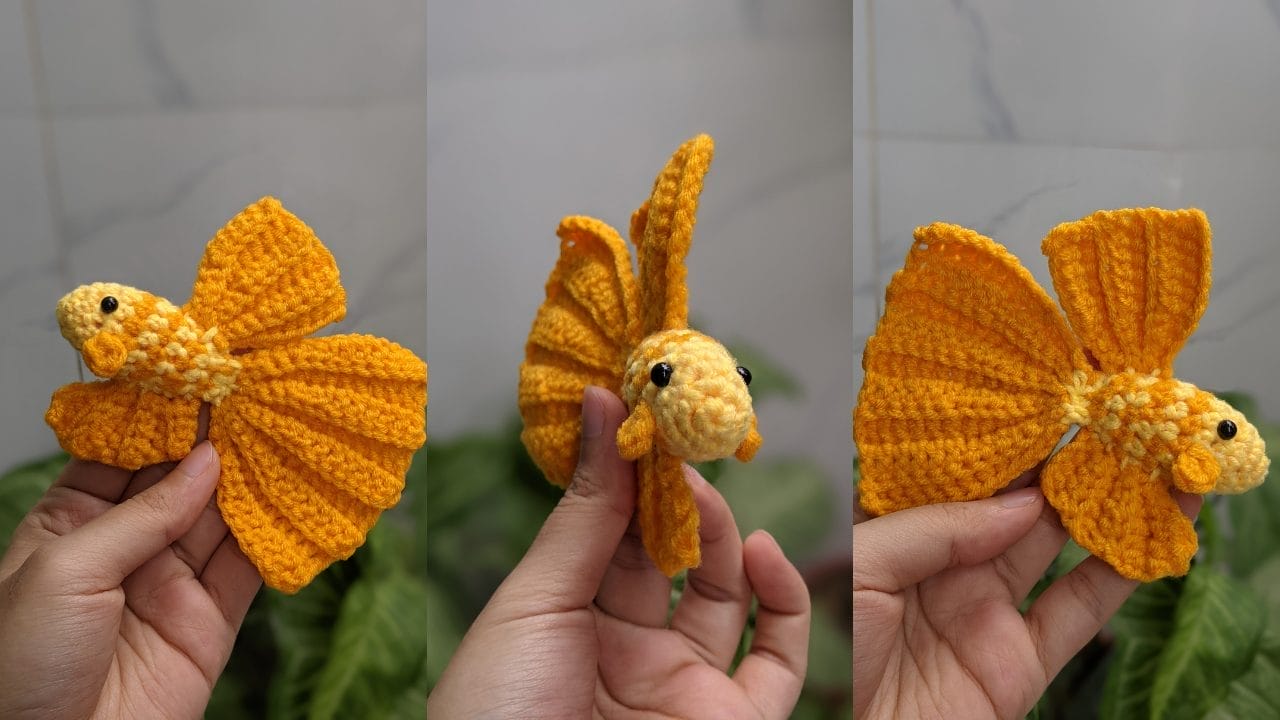
This is the one for people who look at a cartoon fish and think “no, I want it to look like my fish.”
The fins are the whole point. A real betta’s tail is not a triangle, it is a wide flowing fan that trails, and this pattern builds that in rather than tacking a flat shape on the back.
The clever part: the fins are worked with increases spread across the edge rather than in a straight line, which forces a ruffle into the fabric. That ruffle is what makes the tail hang and move instead of sticking out like cardboard.
Details: Palm-sized, 3.5 mm hook, worsted or sport weight, sewn assembly. Intermediate, mostly because of the fin shaping.
Do it in one of the wild color splits and it stops looking like a toy. Half-moon in red, a blue and purple galaxy, a white and orange koi betta.
Get the full pattern here: How to Crochet a Realistic Betta Fish
If you want the color reference, our betta fish varieties guide is basically a yarn shopping list once you look at it that way.
2. Purple Betta Amigurumi (Free Pattern, Ours)

Same fish, different personality. This one leans cute instead of realistic.
At 4.5 inches it is big enough that the fins get room to be dramatic, and purple gives you that deep jewel look that photographs stupidly well.
The clever part: the body stays a simple stuffed teardrop and all the visual work happens in the fins. That means the hard-looking part of the project is actually the fun part, and the shaping is beginner territory.
Details: 4.5 inches, 3.5 mm hook, worsted weight, sewn fins. Advanced beginner.
Make this one first if the realistic betta looks intimidating. The construction logic is the same and it is far more forgiving.
Get the full pattern here: Purple Betta Fish Amigurumi
Not a crocheter? There is a sewn betta plushie version with a free printable pattern instead.
3. Goldfish (Free Pattern, Ours)

The classic. Chunky, bright, and about three inches of pure goldfish energy.
It is the best starting point on this whole list if you have never made an amigurumi fish before, because a goldfish is forgiving. There is no species accuracy to get wrong. A round orange body with a fantail reads as goldfish immediately.
The clever part: the tail is worked flat and then attached, so if you hate your first attempt you throw it out and make another one in ten minutes without unpicking the body.
Details: About 3 inches, 3 mm hook, yellow and orange yarn, step by step photos for every stage.
Make three in slightly different oranges and put them in a bowl. That is the entire project and it looks like you tried much harder than you did.
Get the full pattern here: How to Crochet a Goldfish
4. Clownfish by Loopara

If someone says “Nemo” the second they see it, that is the goal, and this one hits it dead on.
Most crochet clownfish stop at orange with white bands and call it done. This pattern goes one step further, and that step is the entire difference.
The clever part: every white stripe and every fin gets outlined in black backstitch at the end, worked with two strands held together.
That black edging is what real clownfish actually have, and it is the detail everyone’s brain registers without being able to name. Skip it and you have an orange fish with white bits. Add it and you have a clownfish.
The stripes themselves are plain color changes, with a front-loop-only round at round 9 that gives the first stripe a crisp edge to sit against.
Details: 5.1 inches wide by 4.1 inches tall, 3 mm hook, milk cotton, sewn fins, embroidered black detailing.
Do the backstitching last, after everything is assembled and stuffed. Trying to outline a flat fin before it is attached means redoing half of it once it sits at its real angle.
Free pattern by Loopara: Crochet Clownfish
5. Koi Fish by StringyDingDing

The showpiece. Ten inches from mouth to tail tip, which makes it the biggest fish on this list by a wide margin.
Koi are a gift to amigurumi because the markings are supposed to be irregular. There is no wrong place to put a patch of orange. Every real koi is a different splatter pattern, so yours cannot be inaccurate.
The clever part: the tail fin is worked separately and attached, and the pattern gives you the option to hot glue rather than sew the fins and whiskers. Glue on a display piece is not cheating, it is faster and holds a thin fin flatter than stitching does.
Details: 10 inches long, 4 mm hook, medium weight yarn in pink, white, orange and black, 12 mm safety eyes. Rated easy but with a lot of color changes.
That last bit is the honest warning. The stitches are simple. The color management is the work. Cut and rejoin rather than carrying long floats, or the inside turns into a bird’s nest that shows through the stuffing.
Free pattern by StringyDingDing: Koi Fish Amigurumi
6. No-Sew Angelfish by Darling Maple Designs

The fastest fish here, and the one to make when you want something finished tonight.
It is worked in chenille, so the finished fish is a soft squishy palm-sized thing rather than a scale model. Nobody is going to mistake it for an aquarium reference photo, and that is not what it is for.
The clever part: the fins are made with front-loop-only stitches worked into round 8, so they grow straight out of the body as you go. Nothing gets sewn on. That single decision is why the whole thing takes under an hour.
Details: Light super bulky (6) yarn, 5 mm (H) hook, optional 10 mm safety eyes, completely no-sew, under an hour. There is a full video tutorial alongside the written pattern.
Sara rates it for a slightly more advanced crocheter, which is about right. The stitches are easy but the front-loop fin rounds are the kind of thing that makes more sense watching than reading.
Free pattern by Sara at Darling Maple Designs: No-Sew Angelfish Amigurumi
7. Pufferfish by Raffamusa Designs

A ball with a face and spikes. Genuinely one of the most satisfying small projects on this list.
The clever part: the spines are not crocheted. They are embroidered on afterwards by wrapping yarn around two stitches horizontally, over and over, across rounds 1 to 12.
That means you finish a plain round body first, and the fish only becomes a pufferfish in the last twenty minutes. It is the best kind of finishing step, where the thing transforms in your hands.
Details: 4.3 inches wide, 3 mm hook, DK cotton, 8 mm safety eyes between rounds 20 and 21, sewn fins.
Use a contrasting yarn for the spines. Same-color spines on a same-color body is a lot of work for something nobody will notice.
Free pattern by Raffamusa Designs: Pufferfish Amigurumi
8. Bass Fish by StringyDingDing

The odd one out, and the one that will get made the most times.
This is not an aquarium fish, it is a fishing trophy, which makes it the single best crochet gift for anyone who owns a tackle box. Seven inches of largemouth bass with the mouth wide open.
The clever part: you start with the mouth and work backwards into the body. Most fish patterns start at the nose or the tail, and starting at the mouth is what lets that big gaping opening hold its shape instead of collapsing once it is stuffed.
The cream belly is worked flat in rows as a separate piece and attached, which dodges an enormous amount of color changing.
Details: 7 inches long and 3.5 inches tall, 4 mm hook, medium weight yarn in green, dark green, pink and cream. Fins sewn or hot glued. Rated easy.
Free pattern by StringyDingDing: Bass Fish Amigurumi
9. Betta Fish in a Jar by Hooked by Kati

This one is a display piece rather than a plush, and it is the smartest idea on the list.
The finished betta hangs from a length of fishing line inside a clear jar. Rocks or beads in the bottom, the line anchored under the lid, and you get a fish that floats in mid-air and turns slowly when someone walks past.
It solves the problem every amigurumi has, which is that a stuffed toy sitting on a shelf just sits there.
The clever part: the tail and the upper and lower fins are all worked directly onto the finished body without breaking the yarn. Only the two pectoral fins get made separately. Far less assembly than the fin count suggests.
Details: 3.5 inches long by 3 inches tall, 3.5 mm hook, sport weight cotton, safety eyes. Rated intermediate.
This is the teacher gift, the desk gift, and the gift for the person who wants a pet fish and absolutely should not have one.
Free pattern by Kati Brown at Hooked by Kati: Betta Fish in a Jar
For the record, a real betta needs a heated, filtered five gallon tank and not a jar. Our betta fish care guide covers what the living version actually needs.
10. No-Sew Jellyfish by Stitch by Fay

Not technically a fish. Nobody searching for one cares, and neither do we.
Jellyfish are the easiest sea creature to crochet well, because the body is a dome and the hard part, the tentacles, is where the pattern does something smart.
The clever part: rounds 13 and 15 are worked in back loops only, which creates two free front-loop ridges. The eleven tentacles are then chained and slip stitched directly into those ridges. No sewing, and they hang at two different depths, which is what stops it looking like a mop head.
Details: About 4 inches (10 cm), 2.5 mm hook, DK cotton, worked in a continuous spiral from the top down. Beginner level, mostly single crochet.
Fay notes it is the right size for keychains and bag charms, and that is exactly what to do with it. Chain the tentacles at three different lengths as written, because equal-length tentacles look like a fringe.
Free pattern by Fay at Stitch by Fay: No-Sew Crochet Jellyfish
11. Sheldon the Shark by Nicole Chase

Sharks are fish. People forget this constantly, and a crocheted one is a good way to be annoying about it.
Sheldon is five inches long, grey, and has the specific dopey expression that makes a predator read as friendly.
The clever part: the side fins are attached during round 13 of the body by crocheting through both the fin stitches and the body stitches at the same time. So the fins are structurally part of the fish rather than sewn onto it, which means they will never work loose.
Details: About 3.5 inches tall and 5 inches long, 4 mm (G) hook, worsted weight, roughly 32 yards of grey. Safety eyes between rounds 8 and 9 with 7 stitches between them. Advanced beginner, with a full video tutorial.
The gills and mouth are embroidered in black at the end. Keep the mouth zigzag small and shallow. A big toothy grin turns him from a shark into a cartoon.
Free pattern by Nicole Chase: Sheldon the Shark
12. Fish Drawstring Bag by The Caffeinated Snail

The only thing here you can carry, and the reason crochet fish bags keep showing up on every feed.
It is a flat drawstring pouch worked in continuous rounds, turquoise on the bottom half and white on the top, with three orange fish appliques sewn onto the turquoise part like they are swimming across it.
The clever part: the fish are appliques, not shaping. That means the “fish bag” is really just a plain bag plus three tiny flat fish, which puts it firmly in beginner range despite looking like an intermediate project.
Details: 4.5 mm hook, worsted acrylic or cotton, drawstring woven through round 51, picot edging on the top. Size is adjustable by changing the starting chain.
Line it if you plan to put anything heavy in it. Crochet stretches, and a loaded unlined bag sags into a point within a month.
Free pattern by Kimberly Arenas at The Caffeinated Snail: Crochet Fish Bag Pattern
What Yarn Actually Works for Crochet Fish
Yarn changes a fish more than the pattern does, and fish are pickier than most amigurumi because of the fins.
Cotton and milk cotton are the default for a reason. Sharp stitch definition, and crucially they hold a fin flat. A fin needs to be a thin stiff sheet, and cotton does that. It is what the clownfish, the pufferfish and the jellyfish all use.
Worsted acrylic is the cheap forgiving middle ground and comes in every color a tropical fish could possibly be. Fine for bodies, slightly floppy for large fins.
Plush and chenille yarn looks incredible on a round body and is a disaster for fins. The pile hides your stitches so you cannot count, and a chenille fin has no structure at all. Use it for a pufferfish or a blobby goldfish, not for a betta.
Super bulky is what makes the angelfish an under-an-hour project. Big yarn, big stitches, fast finish, no fine detail.
Getting the Colors Right
Real fish are almost never one flat color, which is why a single-color amigurumi fish can look like a sock.
The cheapest upgrade is a belly in a lighter shade. Nearly every fish in the ocean is darker on top and pale underneath, and copying that one rule makes a plain fish look designed.
For color combinations that actually exist, our betta fish varieties guide is a solid reference, and the betta tank aquascape ideas post is useful if you want to build a whole scene around the finished fish.
How to Make Fins That Do Not Look Like Flaps
Fins are where crochet fish go wrong, and there are only three ways to make them.
Worked flat and sewn on. Most control, most work. You decide the angle. Used by the goldfish and the koi.
Grown out of the body with front-loop-only stitches. No sewing, perfectly placed, but the position is fixed by the pattern. Used by the angelfish and the betta in a jar.
Attached mid-round by crocheting through fin and body together. Strongest of the three, because the fin is structural. Used by Sheldon the Shark.
If a sewn-on fin looks wrong, the problem is almost always the angle rather than the stitching. Fins on a real fish sweep backwards, not straight out sideways. Pin it, hold the fish up, then sew.
For a tail that ripples rather than hangs stiff, add increases along the outer edge of the flat piece. Extra stitches around the rim force the fabric to wave.
Hook Size and Why You Should Go Down One
Every yarn label suggests a hook size. For amigurumi, ignore it and go down one or two sizes.
The label size is written for garments, where you want drape. For a stuffed fish you want the opposite, a fabric tight enough that stuffing cannot escape between the stitches.
If you can see white fiberfill through your fish, the hook is too big. That is the fix, every single time.
This is why the jellyfish pairs DK cotton with a 2.5 mm hook, which looks wrong written down and is exactly right in the hand.
Safety Eyes vs Embroidered Eyes
Safety eyes look better and take five seconds. They are also a choking hazard, and the plastic washer on the back is not childproof.
Any fish going to a child under three should have embroidered eyes. Two French knots or a few satin stitches in black yarn. Not negotiable, and much easier to decide before you close up the body.
For everyone else, the eyes go in before the piece is stuffed and closed. Once that washer clicks on, it is not coming off.
Fish eyes sit further forward and higher than you expect. Most patterns place them within the first eight rounds from the nose. Too far back and the fish looks like a whale.
No-Sew vs Sewn: What You Are Actually Choosing
Three of these are no-sew and the rest need assembly. It is the main thing separating them, so it is worth knowing what you are trading.
| No-sew | Sewn | |
|---|---|---|
| Fin placement | Fixed by the pattern, always symmetrical | You choose, adjustable before committing |
| Failure mode | Almost none, it is built in | Crooked fins, visible stitches |
| Speed | Faster | Slower |
| Realism | Limited | Much better for species accuracy |
| Best for | First fish, keychains, quick gifts | Bettas, koi, anything meant to look real |
If this is your first amigurumi fish, start with the no-sew angelfish or our goldfish.
If you keep ending up with lopsided fins, the problem is not your sewing. It is that you sewed before pinning.
Common Fish Amigurumi Mistakes
Overstuffing the body. A rock-hard fish stretches its stitches open and loses the smooth curve. Firm but squeezable.
Stuffing the fins. Fins should be flat. If a fin is a stuffed tube it becomes a leg, and now you have a lizard.
Losing your place in the round. Amigurumi is a continuous spiral with no seam to count from. A stitch marker in the first stitch of every round is not optional, especially with color changes.
Skipping the invisible decrease. A normal decrease leaves a visible bump along the body. The invisible decrease, worked into the front loops only of both stitches, disappears. It is the single change that makes a fish look store-bought.
Carrying long color floats. On a koi, dragging orange behind twelve stitches of white leaves a shadow through the fabric and a mess inside. Cut and rejoin.
Weaving ends into the stuffing. They migrate back out. Weave into the fabric, change direction at least twice, then trim.
Turning Any of These Into a Keychain
Almost all of these shrink into keychains, and the shrinking is done with yarn rather than by editing the pattern.
Work the exact same rounds in DK or sport weight with a 2.5 to 3 mm hook instead of worsted with a 4 mm, and a 4 inch fish becomes a 2 inch charm.
For the hardware, thread a lobster clasp onto a split ring, then sew the ring into the fish with several passes of yarn before you close the body. Attaching it afterwards through a single stitch is how keychains end up with a hole where the fin used to be.
The angelfish, jellyfish, clownfish and goldfish are the four that shrink best. The koi and the bass do not, because their whole appeal is size.
Three of ours have full written instructions for the conversion, and the method is different for each one. The goldfish keychain sews the ring in before the body closes, the betta keychain hides the anchor stitches underneath the top fin, and the purple betta bag charm traps the ring inside the fin’s own foundation row.
Building a Whole Crocheted Aquarium
Once you have made two fish you will want the tank, and this is where it gets fun.
The betta in a jar is the shortcut version. A jar, some fishing line, a handful of glass beads and you have a display in an evening.
For something bigger, a shallow bowl with crocheted gravel, a few strands of chain-stitched green in different lengths as plants, and three or four small fish at different heights reads as an aquarium immediately.
If you want the layout to look believable, steal it from a real one. Our nano aquarium aquascaping ideas post has the plant placement, and the iwagumi aquascape guide explains why stones are grouped in odd numbers, which works exactly the same way in yarn.
Can You Sell What You Make?
This is the question every free pattern raises, and the answer is set by each designer individually.
Most independent designers, including several here, allow you to sell finished items made from their free pattern as long as you credit them as the designer. That credit is usually required in the listing itself.
What is essentially never allowed is redistributing the pattern. Copying the rounds into your own post, selling the PDF, or reuploading it anywhere.
Check the individual pattern page before listing anything, because the terms vary more than people assume.
Several of these designers also sell an ad-free printable PDF of a pattern they give away free on their blog. Buying that is the easiest way to say thanks to someone whose free work you just used.
More Things to Crochet
The skills carry straight across. If you can make a fish body you can make almost any small round animal.
Staying aquatic, our free crochet axolotl pattern uses the same beginner shaping with frilly gills instead of fins.
If you want a whole other rabbit hole, our 10 free crochet frog patterns roundup covers leggy frogs, hats, bookmarks and coasters, and the leggy frog and Pacman frog both have full step by step photos.
On the reptile side there is a crochet leopard gecko and a crochet bearded dragon.
And if the yarn fish have you thinking about the real thing, our gift ideas for betta fish lovers list is where a handmade betta belongs at the top.
Frequently Asked Questions
What is the easiest crochet fish for a complete beginner?
The no-sew angelfish by Darling Maple Designs. Super bulky yarn, a 5 mm hook, no assembly, under an hour. Big yarn means big stitches, which means you can actually see what you are doing.
How much yarn does a crochet fish take?
Very little. Sheldon the Shark, one of the larger ones here, needs about 32 yards of grey plus scraps. Most of these are one-skein projects and the small ones are pure scrap busters.
Why do my crochet fish fins look floppy?
Wrong yarn, usually. Fins need a stiff flat fabric, so use cotton and a small hook. Chenille and plush yarn cannot hold a fin shape no matter how well you work it.
Do I need safety eyes?
No. Every pattern here works with embroidered eyes, and for anything going to a child under three you should embroider them. Two black French knots is all it takes.
Can I make these bigger?
Yes, and the easy way is yarn rather than maths. Work the identical pattern in a heavier yarn with a proportionally bigger hook and the fish scales up. Worsted to super bulky roughly doubles it.
What is the best crochet fish for a keychain?
The jellyfish or the angelfish, because both are already the right size and neither needs assembly. Shrink the clownfish or goldfish with a smaller hook if you want a specific species.
Why does my fish look lumpy?
Three usual suspects. The hook is too big and stuffing is pushing through, you overstuffed and stretched the stitches, or you used a normal decrease instead of an invisible one. Go down a hook size first.
Are these patterns really free?
Yes, all twelve are free to read and use on the designer’s own site. Several designers also offer a paid ad-free PDF of the same pattern, which is optional and a nice way to support them.
Go Make a Fish
Twelve patterns, and you could honestly work through most of them in a couple of weekends.
Start with the goldfish if you want something finished this afternoon, or the realistic betta if you want the one people pick up and ask about.
Then make a second one in a different color, because a single crochet fish looks lonely and two look like a collection.
Come back and show us what you made.
About Author
Hello, I’m Muntaseer Rahman, the owner of AcuarioPets.com. I’m passionate about aquarium pets like shrimps, snails, crabs, and crayfish. I’ve created this website to share my expertise and help you provide better care for these amazing pets.
Disclaimer
This site is owned and operated by Muntaseer Rahman. AcuarioPets.com is a participant in the Amazon Services LLC Associates Program, an affiliate advertising program designed to provide a means for sites to earn advertising fees by advertising and linking to Amazon.com. This site also participates in other affiliate programs and is compensated for referring traffic and business to these companies.