
This post was created with help from AI tools and carefully reviewed by a human (Muntaseer Rahman) . For more on how we use AI on this site, check out our Editorial Policy.
Check Out These FREE Tools We Made JUST For You!
3 Stunning Bearded Dragon Wood Carvings That’ll Make You Look Twice

Ever fallen down a rabbit hole on Etsy or Instagram, only to emerge an hour later convinced you need a hand-carved lizard for your shelf?
Yeah, same. These bearded dragon carvings are that kind of scroll-stopping magic.
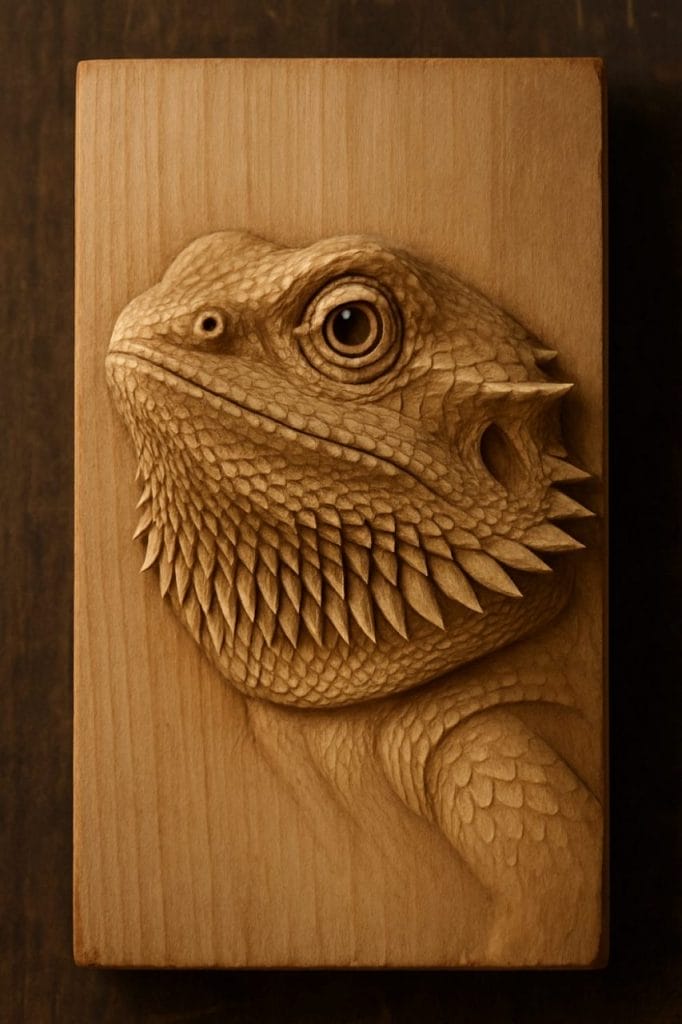
Carving 1: The Spiked Portrait
You know that classic bearded dragon stare? The one that says, “I own this room”? That’s the vibe we’re going for here.
This carving focuses on the head and beard—bold, spiky, and full of attitude. It’s perfect as wall art or even a desk piece if you want something that says, “I love dragons, and I have taste.”
How To Do It
This isn’t a full-body carve. We’re just doing a detailed portrait—mostly the head and upper neck. That’s where the magic lives.
We want the spikes to pop and the eye to feel like it’s staring through your soul. No pressure.
What You’ll Need
- A block of basswood (easy to carve)
- Carving knife (flexible blade, not a kitchen knife please)
- V-gouge or U-gouge for beard texture
- Pencil for sketching
- Sandpaper (220 grit is good)
- Optional: woodburning tool for crisp lines
- Optional: clear wood finish or matte varnish
Steps To Carve The Spiked Portrait
Step 1: Draw the Face
Sketch a bearded dragon’s head straight-on. Focus on the eye, nose, and that glorious spiky beard.
Step 2: Rough Carve the Shape
Cut out the general outline. You don’t need detail here—just blocky and rough. Keep the spikes in mind.
Step 3: Carve the Eye and Snout
Start detailing the eye. Make it slightly sunken with a ridge above it. Give the snout a slight curve to match your beardie’s real face.
Step 4: Add the Beard Spikes
Use your V-tool to cut in the beard spikes. Make them sharp but not too thin or they’ll break. Vary the angles a bit—it looks more natural.
Step 5: Refine and Smooth
Clean up any rough edges. Use sandpaper around the eye and snout but leave the spikes a little rough for texture.
Step 6 (Optional): Burn the Edges
If you’re feeling fancy, use a woodburning tool to darken around the eyes or define the spikes even more.
Step 7: Finish It
Apply a clear matte finish if you want to seal it up. Or leave it raw if you like that natural wood feel.
Carving 2: The Lazy Log Lounger
You’ve seen it. Your beardie draped across a log like royalty after brunch. That relaxed, “I run this jungle” look. This carving captures that exact vibe.
It’s chill. It’s full-body. And it screams bearded dragon energy.

How To Do It
This one’s a full-body carving. The pose is stretched out, one leg lazily flopped to the side, head slightly raised. The log is part of the carving, not a separate piece.
The goal? Make it look like your beardie’s mid-nap, soaking up imaginary rays.
What You’ll Need
- A longer piece of basswood or butternut
- Carving knife for outlines
- Gouges for shaping the log
- Fine-point V-tool for scale texture
- Sandpaper for smoothing (especially the log)
- Optional: wood stain to separate beardie and log visually
Steps To Carve the Lazy Lounger
Step 1: Sketch the Scene
Draw a stretched-out bearded dragon on a log. Focus on limb placement, tail curve, and head tilt.
Step 2: Outline the Body
Start carving around the dragon’s outline. Keep the shape rounded, not flat—this ain’t a cookie.
Step 3: Define the Log
Carve around the base to make it clear that it’s a log, not just a weird lump. Add bark texture if you’re feeling brave.
Step 4: Carve the Limbs and Tail
Use your gouge for the legs. Don’t overdo the detail—just enough to show they’re relaxed. Curve the tail slightly around the log.
Step 5: Detail the Face and Scales
This part adds personality. Give it a sleepy but smug look. Add some light texture across the back and beard.
Step 6: Smooth and Separate
Sand the log smooth, keep the dragon a bit textured. You can even stain the log darker so your dragon stands out.

Your Beardie Has More to Say…
This article tells you WHAT to do, but do you know WHY your dragon needs it? Or what they’re thinking when you do it wrong?
Read the full rant (all 20 chapters of it) in: “What Your Bearded Dragon Wishes You Knew”
*Told by a very frustrated beardie who’s had ENOUGH of watching you guess.*
Carving 3: The Mini Bearded Magnet
This one’s for the fridge. Or your filing cabinet. Or anywhere that could use a little bearded dragon staring you down while you try to focus on something boring.
It’s small. It’s cute. And it still packs that beardie charm in a bite-sized block of wood.

How To Do It
We’re carving a simplified version of a bearded dragon—just the head or head-and-shoulders. The trick is making it recognizable without overloading the details.
Stick a magnet on the back, and boom—your lizard is now guarding the leftovers.
What You’ll Need
- A small chunk of basswood (about 2×2 inches)
- Basic carving knife
- Fine V-tool for some texture
- Glue-on magnet disc
- Optional: wood stain or paint
- Optional: epoxy or super glue for the magnet
Steps To Make the Mini Magnet
Step 1: Cut the Block
Start with a smooth 2-inch square of wood. Sand it if needed.
Step 2: Sketch the Face
Draw a mini version of your beardie—focus on the spiky cheeks and that smug smile.
Step 3: Carve the Basic Shape
Round the edges and outline the face. Keep the shape bold and simple.
Step 4: Add Some Detail
Use a V-tool to scratch in a few spikes or scale patterns. You don’t need much—less is more with tiny carvings.
Step 5: Smooth and Finish
Give it a light sanding. Optionally add some light stain or color wash.
Step 6: Stick the Magnet
Glue a magnet on the back. Let it cure for a few hours before slapping it on your fridge.

About Author
Hello, I’m Muntaseer Rahman, the owner of AcuarioPets.com. I’m passionate about aquarium pets like shrimps, snails, crabs, and crayfish. I’ve created this website to share my expertise and help you provide better care for these amazing pets.
Disclaimer
This site is owned and operated by Muntaseer Rahman. AcuarioPets.com is a participant in the Amazon Services LLC Associates Program, an affiliate advertising program designed to provide a means for sites to earn advertising fees by advertising and linking to Amazon.com. This site also participates in other affiliate programs and is compensated for referring traffic and business to these companies.