
This post was created with help from AI tools and carefully reviewed by a human (Muntaseer Rahman) . For more on how we use AI on this site, check out our Editorial Policy.
Check Out These FREE Tools We Made JUST For You!
The Chameleon Cage Setup Guide That Actually Keeps Them Alive

So you want a chameleon.
Great choice! These color-changing tree dragons are absolutely fascinating to watch. But here’s the thing nobody tells you at the pet store: setting up their cage wrong is basically asking for a slow-motion disaster.
I’ve seen it happen too many times. Someone buys a cute baby chameleon, puts it in whatever cage the store recommended, and six months later they’re crying to their vet about why their little buddy isn’t doing well.
Let’s not be that person.
Why Most Chameleon Setups Fail (And How to Avoid It)
The problem is simple: chameleons aren’t bearded dragons.
They don’t forgive mistakes. Get the humidity wrong? Respiratory infection. Not enough hiding spots? Constant stress. Use the wrong lighting? Metabolic bone disease that’ll break your heart.
The most common mistake? Cages that are too small.
We’re talking about the pet store employee who swears a 18x18x36 inch cage is “perfect” for an adult veiled chameleon. That’s like telling someone a closet is a great bedroom.
For most chameleon species (veiled, panther, Jackson’s), you need at least 24x24x48 inches. Bigger is better. Way better.

Screen vs. Glass vs. Hybrid: The Great Cage Debate
Here’s where things get spicy.
Walk into any reptile forum and you’ll see people arguing about cage types like it’s a political debate. “Screen or glass?” they type furiously at 2am.
The truth? It depends on where you live.
Screen Cages
These are the classic choice for a reason.
They’re lightweight, cheap, and give you incredible airflow. You can grab a decent ZooMed Reptibreeze for around $80-100. The mesh sides let heat and humidity escape, which sounds bad but actually prevents the bacterial nightmare that happens in stagnant air.
The downside? If you live somewhere dry or cold, you’ll be fighting a losing battle trying to keep humidity up.
Best for: Warm, humid climates where you’re not running AC 24/7.
Glass Cages
Glass terrariums are like the opposite of screen cages.
They hold humidity like a champ and keep temperatures stable. But that comes with a cost: ventilation becomes your enemy. Stagnant, humid air = respiratory infections waiting to happen.
If you go glass, you need serious ventilation at the top and drainage holes at the bottom. We’re talking 100-120 gallon minimum for an adult chameleon.
Best for: Dry climates, air-conditioned homes, or if you’re keeping species that need higher humidity.
Hybrid Cages (The Goldilocks Option)
Two or three sides glass, one or two sides screen.
These are expensive but they solve most problems. You get humidity control without turning your cage into a bacterial petri dish. Dragon Strand makes some incredible hybrid options, though you’ll pay $300-500+ for them.
Best for: People who want the best setup and don’t mind spending extra.
The Four Gradients: What Separates Good Cages from Great Ones
Ready for the part that actually makes sense of all this?
Chameleons don’t just need a cage. They need gradients. Think of it like giving them options throughout their day.
1. Heat Gradient
Your chameleon needs to move between warm and cool spots.
Set up a basking spot at 85-90°F (use a 75-100 watt bulb), then create areas that drop to 70-80°F elsewhere in the cage. At night, everything drops to 65-70°F.
Put the heat lamp in one back corner on top of the cage (never inside where they can burn themselves). Then arrange branches so your chameleon can choose where to hang out.
2. UVB Gradient
This is non-negotiable.
Chameleons need UVB light to process calcium. Without it, they develop metabolic bone disease and basically their bones turn to mush. It’s horrible.
Use a linear T5HO UVB bulb (not those wimpy coil bulbs pet stores push). For veiled and panther chameleons, go with 5-6% UVB. Place it flat across the top of the cage, spanning the full width.
The bulb sits outside the cage, shining down through the screen. Your chameleon should be able to get within 6-8 inches of it when basking, but not closer (burns are real).
Replace UVB bulbs every 6 months even if they still glow. The UVB output dies long before the visible light does.
3. Humidity Gradient
This one confuses people.
Chameleons need humidity, but not the constant rainforest vibe you’d expect. They actually do best with humidity spikes rather than constant moisture.
During the day: 30-50% humidity At night: 60-80% humidity (with fogging)
The secret? Mist heavily at night and early morning, then let things dry out during the day. This mimics their natural environment way better than spraying every few hours.
4. Exposure Gradient (The Hiding Spot Nobody Talks About)
Can your chameleon disappear from view?
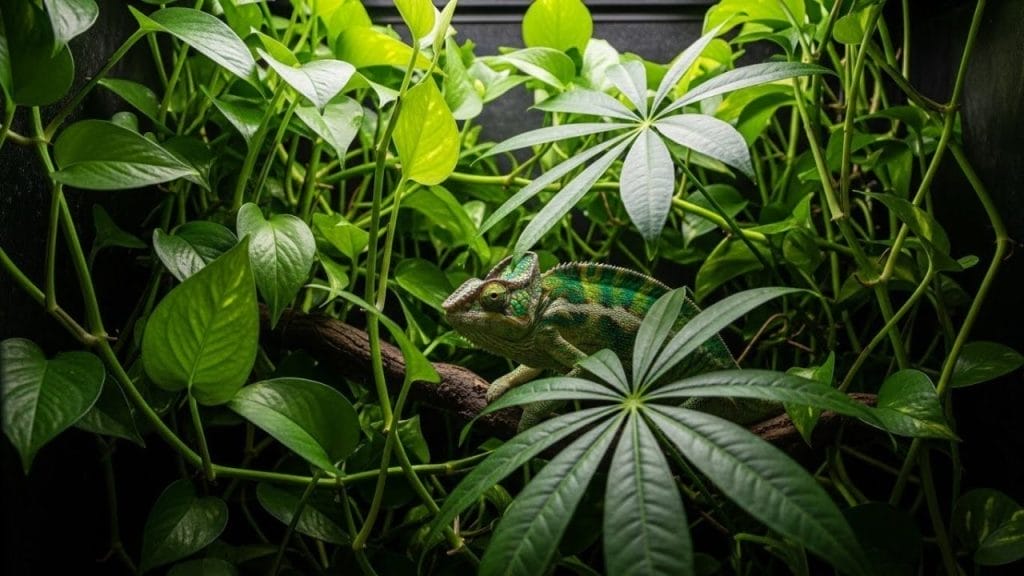
If you can always see your chameleon clearly, you’ve failed this step. They need dense foliage where they can hide and feel secure. Ironically, chameleons with good hiding spots actually come out MORE because they’re less stressed.

Plant Selection: The Living Cage Interior
Forget those sad plastic plants from the pet store.
Live plants do three critical things: maintain humidity, provide drinking surfaces, and give your chameleon actual hiding spots. Plus they look way better than fake nonsense.
The Holy Trinity of Chameleon Plants
Pothos (Epipremnum aureum)
This thing refuses to die. I’ve tried to kill mine through pure neglect and it just keeps growing. Trailing vines create hiding spots, the leaves hold water droplets perfectly, and chameleons can nibble on it safely.
Umbrella Plant (Schefflera arboricola)
The workhorse of chameleon cages. Thick branches for climbing, dense foliage for hiding, and it handles the abuse of daily misting like a champ. Place this on the cage floor as your centerpiece.
Ficus benjamina (Weeping Fig)
Creates that jungle canopy feel. Be warned though: when you break a branch, it leaks milky sap. Wipe it up quick because nobody wants that in their chameleon’s eye.
Other Great Options
- Hibiscus: Bonus points because the flowers are edible
- Spider Plant: Easy care, adds variety
- Dracaena: Great for vertical height
- Boston Fern: Humidity powerhouse
Plant Prep (Don’t Skip This)
Store-bought plants are loaded with pesticides and fertilizers.
- Step 1: Repot the top 50% of soil with organic, pesticide-free soil
- Step 2: Cover remaining soil with large rocks or screen (prevents your chameleon from eating it)
- Step 3: Wash every leaf thoroughly to remove chemical residue
Mount trailing plants like pothos to the cage sides using Dragon Ledges or command hooks. This creates vertical greenery without eating up precious floor space.
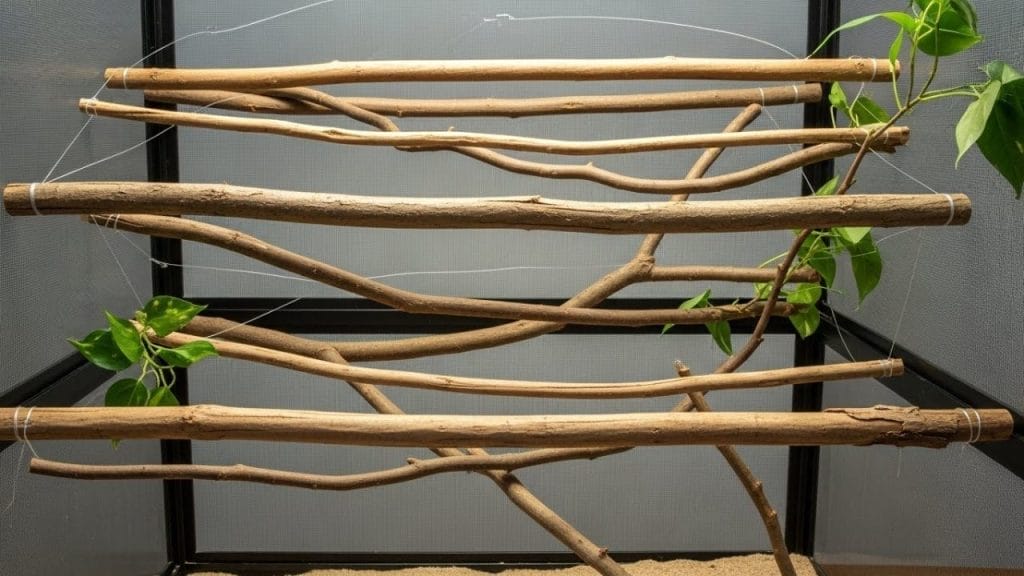
Branch Network: The Highway System
Horizontal branches are what chameleons actually use.
Yeah, they can climb vertically, but they rest and hang out horizontally. Set up a crisscross network of branches at different heights throughout the cage.
Use natural branches (baked at 200°F for 30 minutes to kill bugs) or bendy vines from the pet store. Make sure branch thickness varies – thin twigs for the tail, thicker branches for sleeping.
Pro tip: Secure everything with fishing line or small wire threaded through the screen. Nobody wants a branch collapse at 3am.
The Hydration System (Where Most People Mess Up)
Chameleons don’t drink from bowls.
They evolved to drink raindrops and morning dew from leaves. So you need to replicate that, and there are two main tools.
Automated Misting System
This is the big one.
Hand-misting with a spray bottle is theoretically possible, but realistically you’ll forget or get lazy. An automated system like MistKing or Cli-Mist ($100-200) is worth every penny.
Set it to mist:
- 5-10 minutes before lights on (morning dew simulation)
- 1-2 minutes mid-afternoon (optional, mainly for humidity)
- During the night (combined with fogging)
The goal is coating leaves with water droplets, not soaking your chameleon directly. They hate being blasted with water.
Dripper System
Backup hydration.
Run a gravity-fed dripper ($10-15) for at least an hour during the late afternoon. Position it so water drips onto leaves near where your chameleon hangs out.
This gives them constant access to water throughout the day. A properly hydrated chameleon will actually ignore the dripper in late afternoon. A thirsty one will rush over to drink.

Fogging (The Night Magic)
Here’s the secret weapon: nighttime fogging.
Use a fogger ($30-50) to create humid air while your chameleon sleeps. This prevents dehydration overnight and means you don’t need to drown the cage during the day.
Fog for 2-4 hours in the early morning (like 3-6am). Your chameleon wakes up in a humid environment, drinks some dew, and you’re golden.
Drainage: The Unsexy But Critical Part
All that misting creates water. Lots of it.
If water pools at the bottom of your cage mixing with poop and dead crickets, you’ve created bacterial soup. Your chameleon will get sick. Guaranteed.
Option 1: The DIY Screen Floor
Replace your solid floor panel with a screen panel. Water falls through, you collect it in a tray underneath.
This is what pros use. Grab a wet/dry vacuum with a crevice tool ($30) and suck water from the drainage tray weekly. Way easier than lifting the entire cage.
Option 2: Substrate-Free Floor
Paper towels or newspapers on a solid floor.
Simple, cheap, easy to clean. Just swap them out every few days and make sure water doesn’t pool anywhere.
Option 3: Bioactive Setup (Advanced)
Layer of LECA clay balls for drainage, substrate barrier, then bioactive soil with cleanup crew (isopods, springtails).
This is gorgeous and functional, but it’s a whole separate project. Start simple, go bioactive later once you’ve got the basics down.
Where to Put Your Cage (Location Matters More Than You Think)
You can have the perfect setup and still screw it up with bad placement.
Avoid these spots:
- Near AC vents or heaters (temperature chaos)
- Next to windows (draft city + temperature swings)
- High traffic areas (constant stress)
- On the floor (chameleons feel threatened when everything’s above them)
Ideal placement:
- Quiet corner of a room you use regularly
- Top of cage at or above your eye level (use a sturdy stand)
- Away from TVs and loud speakers
- Room with stable ambient temperature (68-75°F)
Your chameleon needs to see you’re not a threat, but also needs to not see you constantly walking past all day. It’s a balance.
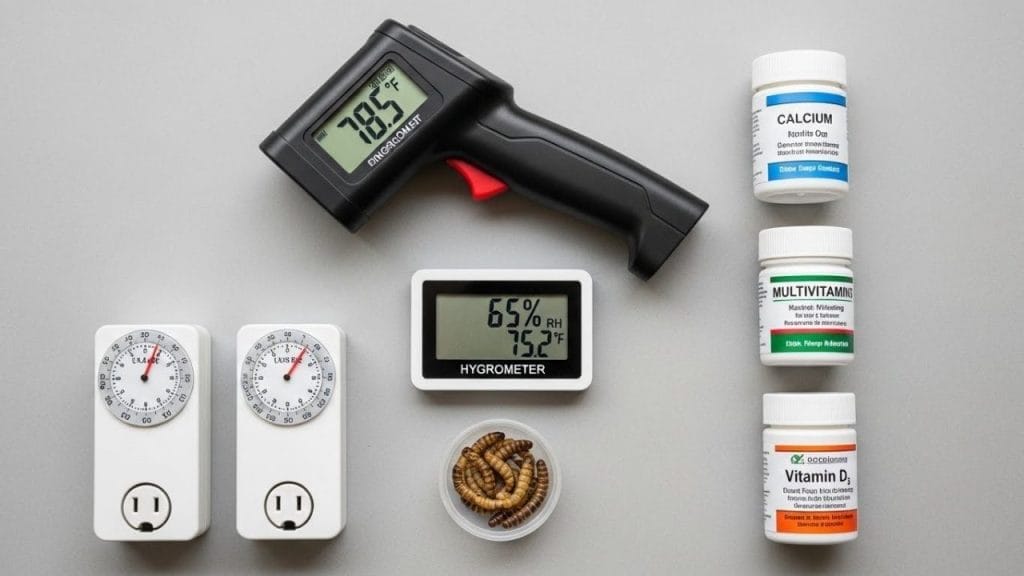
Monitoring Equipment You Actually Need
Forget those stick-on thermometer strips.
- Infrared temperature gun ($15-20): Point and shoot to check basking temps accurately. Game changer.
- Digital hygrometer ($10-15): Tracks humidity levels. Get one with a probe you can position at different cage heights.
- Timer outlets ($10-20 each): Automate your lighting schedule. Your chameleon’s circadian rhythm depends on consistency.
Check temps and humidity daily for the first few weeks. Once everything’s stable, you can ease up to weekly checks.
Lighting Schedule and Placement
Everything goes on top of the cage, shining down.
- Heat lamp: Back corner, 75-100 watts depending on room temperature
- UVB linear bulb: Spans the width, positioned over basking area
- Both on timers: 12 hours on, 12 hours off
Raise basking bulbs a few inches off the screen if needed to prevent burns. Use an infrared temperature gun ($15-20) to check basking spot temps – thermometer strips are notoriously inaccurate.
At night, all lights go OFF. Chameleons need darkness and a temperature drop to around 65-70°F. No heat lamps, no colored bulbs, nothing.
Species-Specific Requirements (Not All Chameleons Are the Same)
This guide focuses on the “big three” – veiled, panther, and Jackson’s chameleons.
Veiled Chameleons (Chamaeleo calyptratus)
- Basking: 90-95°F
- Ambient: 72-80°F
- Humidity: 30-50% day, 80% night
- Personality: Hardy, tolerates mistakes better, sometimes eats plants
- Note: These guys are from Yemen – they handle drier conditions than you’d think
Panther Chameleons (Furcifer pardalis)
- Basking: 85-90°F
- Ambient: 70-80°F
- Humidity: 50-70% day, 80-100% night
- Personality: More chill, stunning colors, Madagascar natives
- Note: Need slightly higher humidity than veiled
Jackson’s Chameleons (Trioceros jacksonii)
- Basking: 80-85°F (cooler!)
- Ambient: 65-75°F
- Humidity: 50-80% day, 80-100% night
- Personality: Montane species, need cooler temps and higher humidity
- Note: These are the “three-horned” chameleons, need nighttime temps in the 50s-60s
Getting species-specific temps wrong is like running your AC at 85°F in summer because “warm is good.” Context matters.

Feeding Setup and Supplement Schedule
You need a feeding station.
Cup feeding is way better than just tossing crickets into the cage. Get a feeding cup or small bowl, attach it to a branch in the mid-level area, and your chameleon learns to hunt there.
Benefits? No escaped crickets hiding in your plants, no feeders eating your expensive live plants, and you can monitor exactly how much your chameleon eats.
Feeder variety matters:
- Crickets (staple)
- Dubia roaches (staple, way cleaner than crickets)
- Black soldier fly larvae (calcium-rich)
- Hornworms (hydration boost, treat)
- Silkworms (nutritious)
Avoid mealworms – the hard exoskeleton can cause impaction.
Supplement Schedule (Non-Negotiable)
Your feeders need to be “gutloaded” (fed nutritious food) 24 hours before feeding them to your chameleon.
Calcium without D3: Every feeding Calcium with D3: Twice per month Multivitamin: Twice per month
Dust your feeders in a bag with supplement powder, shake gently, feed immediately. This prevents metabolic bone disease and nutritional deficiencies.
Skip this and your chameleon’s bones literally become rubber. Not exaggerating.
Plant Care and Maintenance
Live plants need maintenance too.
- Watering: The misting system handles most of it, but check soil weekly. If it’s bone dry, water the plants directly.
- Pruning: Trim back overgrowth monthly. Pothos especially will try to take over the entire cage.
- Fertilizer: Use very diluted organic fertilizer (half strength) once monthly. Avoid anything with harsh chemicals.
- Replacing plants: Expect to swap out struggling plants every 6-12 months. Not all plants survive the constant misting and chameleon abuse.
Rotate plants outdoors for “recovery periods” if you have backup plants. The natural sunlight does wonders.
Substrate Options: Simple to Advanced
Beginner: Paper towels or newspaper
Cheap, easy to replace, you can see poop immediately. Change every 2-3 days.
Intermediate: Bare floor with drainage
Just a screen floor or PVC floor with holes. Water drains to a tray below. Clean and simple.
Advanced: Bioactive substrate
This is the “living terrarium” approach:
- 1-2 inches LECA clay balls (drainage layer)
- Substrate barrier (fiberglass screen or weed fabric)
- 2-3 inches ABG mix or organic topsoil blend
- Cleanup crew: springtails and isopods
The cleanup crew eats poop and dead feeders, breaking everything down naturally. It’s gorgeous, functional, but requires research to do right.
Don’t use: Sand, wood chips, or anything your chameleon might accidentally eat. Impaction kills.
Cleaning and Maintenance Schedule
Daily (5 minutes)
- Check water reservoir levels
- Remove any visible poop
- Verify temps and humidity
- Observe chameleon behavior
Weekly (20 minutes)
- Deep clean feeding cup
- Remove/vacuum drainage tray water
- Spot clean any poop on branches
- Check plant health
- Refill supplement containers
Monthly (1 hour)
- Full cage wipe-down with reptile-safe cleaner
- Prune plants
- Check all equipment (timers, misting nozzles, bulbs)
- Replace paper towels/substrate if using
- Inspect branches for mold or damage
Every 6 Months
- Replace UVB bulb (mark the date!)
- Deep clean misting system (prevents algae)
- Evaluate overall setup and make improvements
Regular maintenance prevents the bacterial nightmare that leads to respiratory infections.
Budget Breakdown: The Real Costs
Let’s be honest about money.
Initial Setup Costs:
- Cage (24x24x48): $80-150
- Linear T5HO UVB fixture + bulb: $60-100
- Heat lamp + bulb: $20-40
- Automated misting system: $100-200
- Dripper: $10-20
- Live plants (3-5): $30-75
- Branches and vines: $20-50
- Digital thermometer/hygrometer: $20-30
- Temp gun: $15-20
- Drainage solution: $20-50
- Timers: $20-40
- Stand/table: $30-100
Total: $425-875 depending on how fancy you go.
Monthly Ongoing Costs:
- Feeders: $20-40
- Supplements: $5-10 (they last months)
- Electricity: $10-15
- Plant replacement: $10-20 (as needed)
Total: $45-85 per month
This doesn’t include the chameleon itself ($75-400 depending on species and morph) or emergency vet visits.
The First Week: Acclimation Period
Your chameleon will hate you at first.
Seriously, expect 3-7 days of stress. They’ll hide, refuse food, and generally act like you’ve ruined their life. This is normal.
Do this:
- Leave them alone except for misting/feeding
- Cover 3 sides of the cage with sheets (reduces visual stress)
- Keep room quiet
- No handling for at least 5-7 days
Don’t do this:
- Hover around the cage staring
- Try to hand feed immediately
- Move the cage around
- Invite friends over to see your “cool new pet”
After a week, they’ll start to settle in. Remove the side coverings gradually. By week two, they should be eating normally and showing natural behaviors.
If they’re still refusing food after 10-14 days, contact a reptile vet.
Common Setup Mistakes That’ll Wreck Your Chameleon
Let me save you from heartbreak:
- Using compact/coil UVB bulbs – These are garbage. Linear T5HO only.
- Heat rocks or pads – Chameleons are arboreal. They bask from above, not below. Ground heat will burn them.
- Water bowls – Drowning hazard, bacteria factory, and they won’t drink from them anyway.
- Putting the cage on the floor – The top of your cage should be at or above eye level. Chameleons feel threatened when everything towers over them.
- Not enough foliage – If you can see your chameleon clearly from every angle, add more plants.
- Misting directly at your chameleon – They hate it and will run away. Mist the plants and let them drink from leaves.
- Keeping multiple chameleons together – They’re solitary. One chameleon per cage, period.
The Final Checklist Before Bringing Your Chameleon Home
□ Cage is 24x24x48 inches minimum (2x2x4 feet)
□ Linear T5HO UVB bulb installed and working
□ Heat lamp creating 85-90°F basking spot
□ Temperature gradient verified with temp gun
□ 2-3 live plants minimum (more is better)
□ Branch network at multiple heights
□ Automated misting system or committed hand-misting schedule
□ Dripper set up and positioned
□ Drainage solution in place
□ Lights on timers (12 hours on/off)
□ Hiding spots where chameleon can disappear from view
□ Cage positioned with top at/above eye level
The Reality Check
Setting up a proper chameleon cage costs $400-600 minimum if you do it right from the start.
That’s not including the chameleon itself or ongoing costs like feeders and supplements. You can cut corners and go cheaper, but you’ll pay for it later in vet bills or, worse, a dead chameleon.
I know that sounds harsh. But chameleons aren’t starter reptiles. They’re specialists that need specific conditions to thrive.
The good news? Once you’ve got the setup dialed in, maintenance is actually pretty simple. Check water levels, swap out paper towels, monitor temps and humidity. Maybe 15-20 minutes a day of actual work.
Watch Your Chameleon, Not the Internet
Here’s the thing nobody tells beginners: your chameleon will show you what’s working.
Spending all day at the bottom of the cage? Too stressed, needs more cover. Constantly trying to escape? Something’s wrong with temps or humidity. Drinking heavily when you run the dripper? You’re not misting enough. Ignoring the dripper completely? Perfect, you nailed the hydration.
Learn to read these signals and adjust. There’s no perfect one-size-fits-all setup because every home is different. The cage that works in humid Florida won’t work the same in dry Arizona.
But if you follow these principles – proper size, gradients, live plants, hydration, drainage – you’re giving your chameleon what it actually needs to thrive.
Not just survive. Thrive.
Now go build something your chameleon will actually enjoy living in.

About Author
Hello, I’m Muntaseer Rahman, the owner of AcuarioPets.com. I’m passionate about aquarium pets like shrimps, snails, crabs, and crayfish. I’ve created this website to share my expertise and help you provide better care for these amazing pets.
Disclaimer
This site is owned and operated by Muntaseer Rahman. AcuarioPets.com is a participant in the Amazon Services LLC Associates Program, an affiliate advertising program designed to provide a means for sites to earn advertising fees by advertising and linking to Amazon.com. This site also participates in other affiliate programs and is compensated for referring traffic and business to these companies.